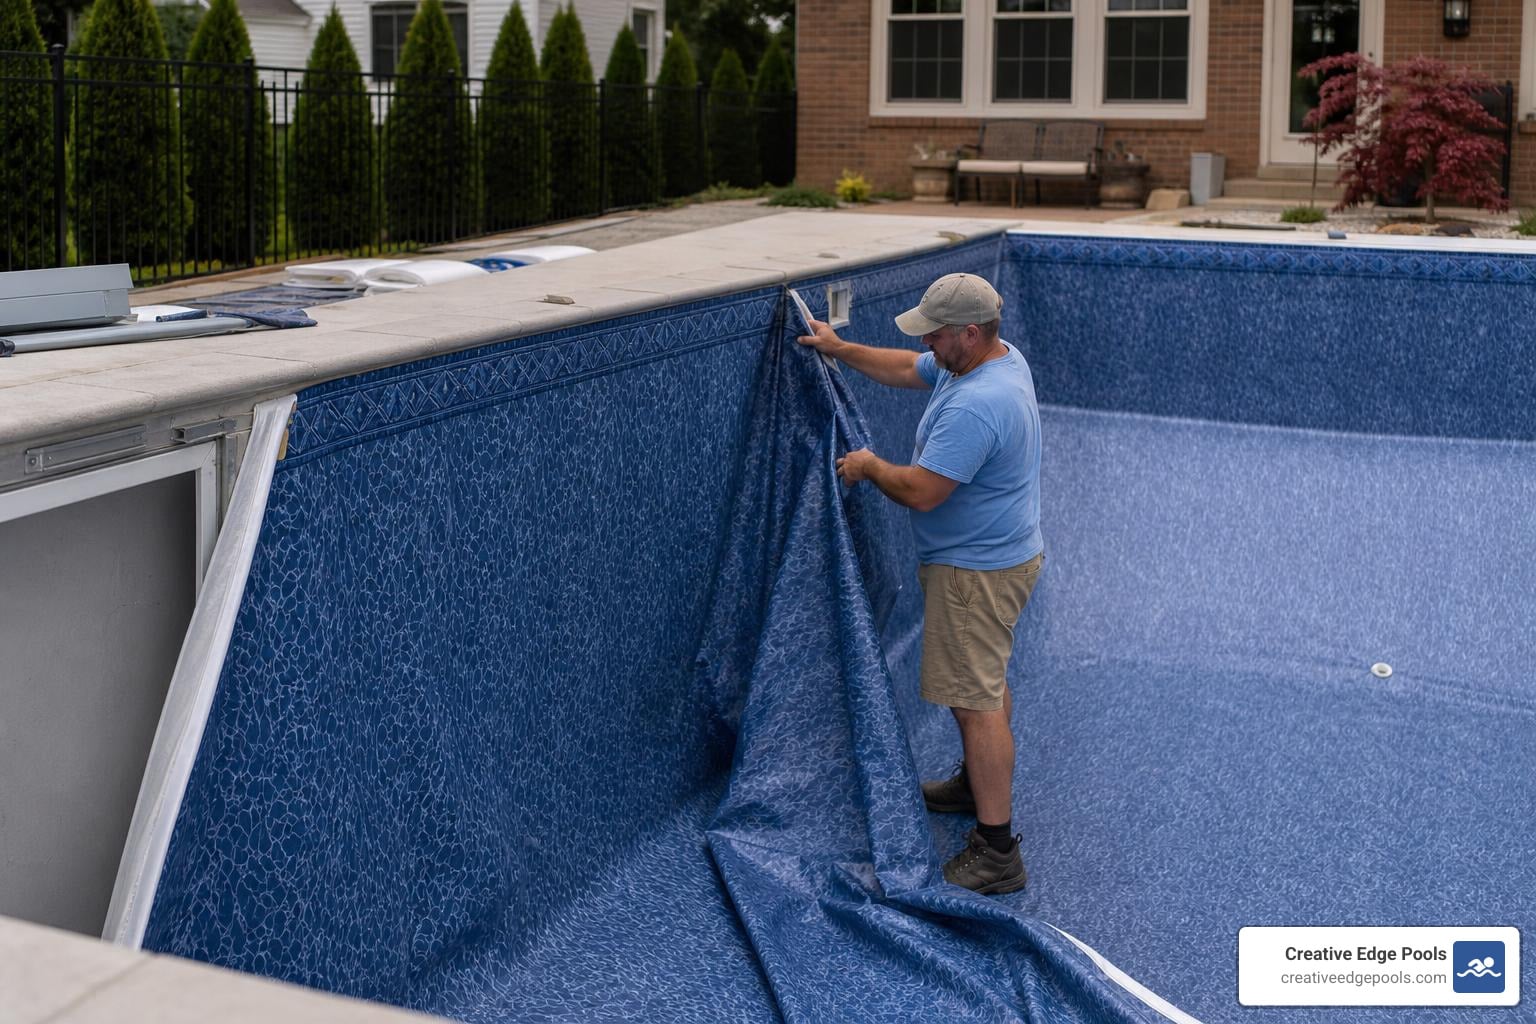
Why Lining a Pool the Right Way Protects Your Investment for Over a Decade
Lining a pool correctly is one of the most important decisions you’ll make as a pool owner — and one of the most misunderstood.
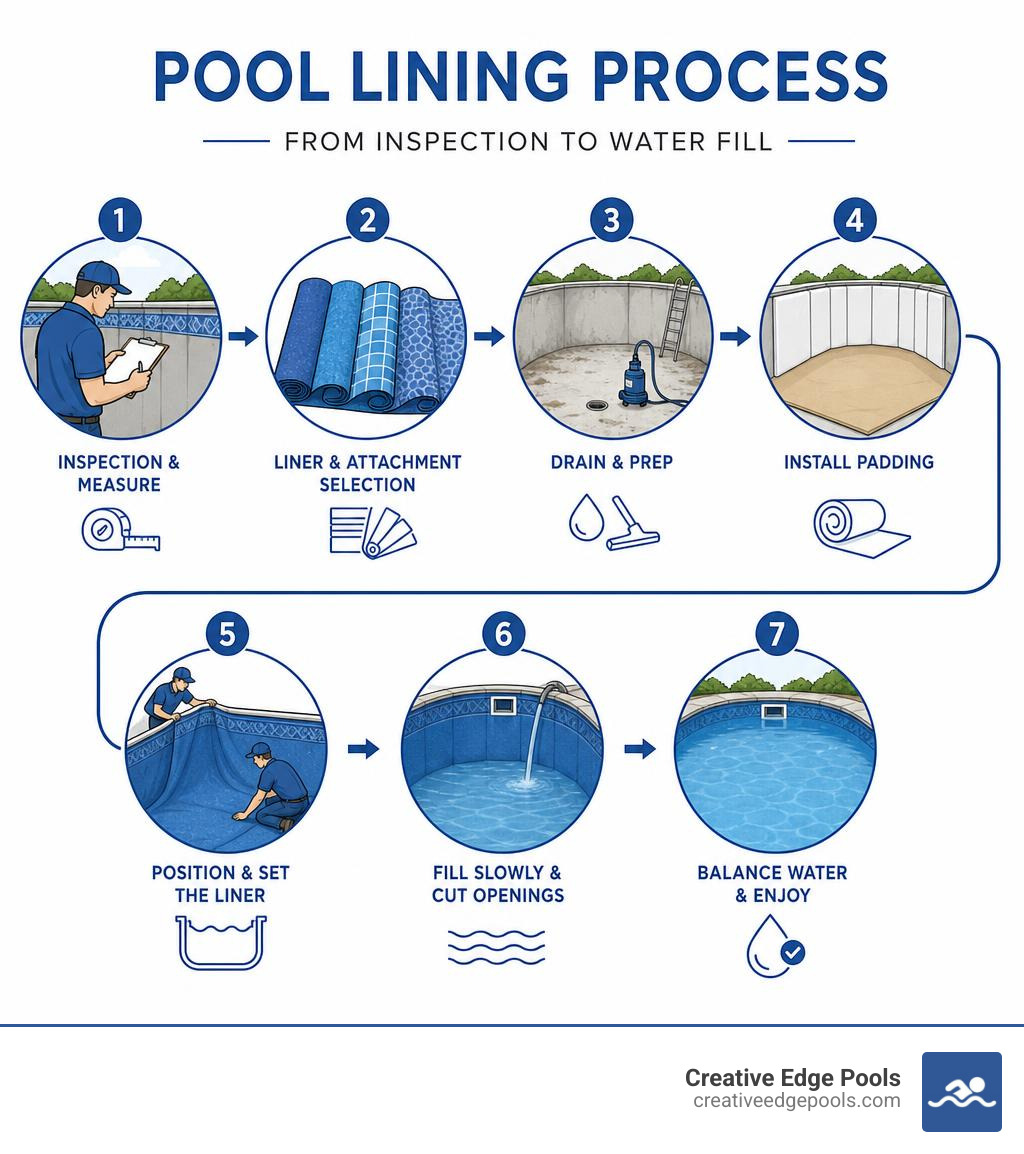
Here’s a quick overview of what the process involves:
How to Line a Pool: Quick Summary
- Choose the right liner — match the type (overlap, beaded, unibead, or custom inground) to your pool’s structure and size
- Measure accurately — inside wall to inside wall, including depth, wall height, steps, and any special features
- Drain and prep — pump out all water, remove the old liner, inspect and repair the base and walls
- Install padding — add wall foam and a floor pad or sand/vermiculite base before the new liner goes in
- Position and set the liner — hang the bead, smooth from the center outward, and vacuum out trapped air
- Fill slowly and cut last — add water gradually while smoothing wrinkles; only cut skimmer and return openings after water reaches 3 inches below each fitting
- Balance water chemistry — start with alkalinity, then pH, calcium hardness, and finally chlorine
A vinyl pool liner does more than make your pool look great. It is the entire waterproofing system standing between your water and your pool’s structure. When it fails — and signs like fading, bead slippage, or unexplained water loss mean it already is — every extra week you wait can mean rusted panels, damaged walls, and a repair bill that grows fast.
Most pool owners in areas like Portsmouth, NH, Exeter, NH, and Wilmington, MA are surprised to learn that a standard 20-mil liner lasts only 8–12 years on average, and that improper installation or unbalanced water chemistry can cut that lifespan nearly in half.
This guide walks you through every step — from choosing the right liner to filling the pool and balancing the water — so you know exactly what a proper liner replacement looks like, whether you’re planning ahead or already seeing the warning signs.
Before Lining a Pool: Choose the Right Liner, Attachment, and Scope
Before anyone drains a pool or opens a liner box, the first job is choosing the correct liner system. A vinyl liner is not one-size-fits-all. It has to match the pool structure, wall height, attachment style, depth profile, steps, benches, drains, returns, and coping.
In Massachusetts and New Hampshire, we also plan around weather. Vinyl becomes easier to position when it is warm and flexible, so spring and early summer scheduling matters, especially in places like Dover, NH, Exeter, NH, Wilmington, MA, and Andover, MA.
Above-Ground vs. Inground Vinyl Liners
Above-ground and inground liners both create a waterproof vinyl membrane, but they are built and installed differently.
Above-ground liners are usually ordered by stock pool size, shape, wall height, and attachment type. Common details include:
- Round, oval, or rectangular pool shape
- 48-inch, 52-inch, or 54-inch wall height
- Flat bottom or expandable/deep-center bottom
- Overlap, beaded, or unibead attachment
Inground vinyl liners are typically custom measured. They must account for:
- Pool length and width
- Shallow end and deep end depths
- Hopper shape
- Slopes
- Corner radius
- Steps, benches, tanning ledges, and swim-outs
- Main drains, lights, returns, and skimmers
- Existing bead receiver or coping system
For homeowners considering a custom inground replacement, we recommend reviewing our inground vinyl liner replacement options.
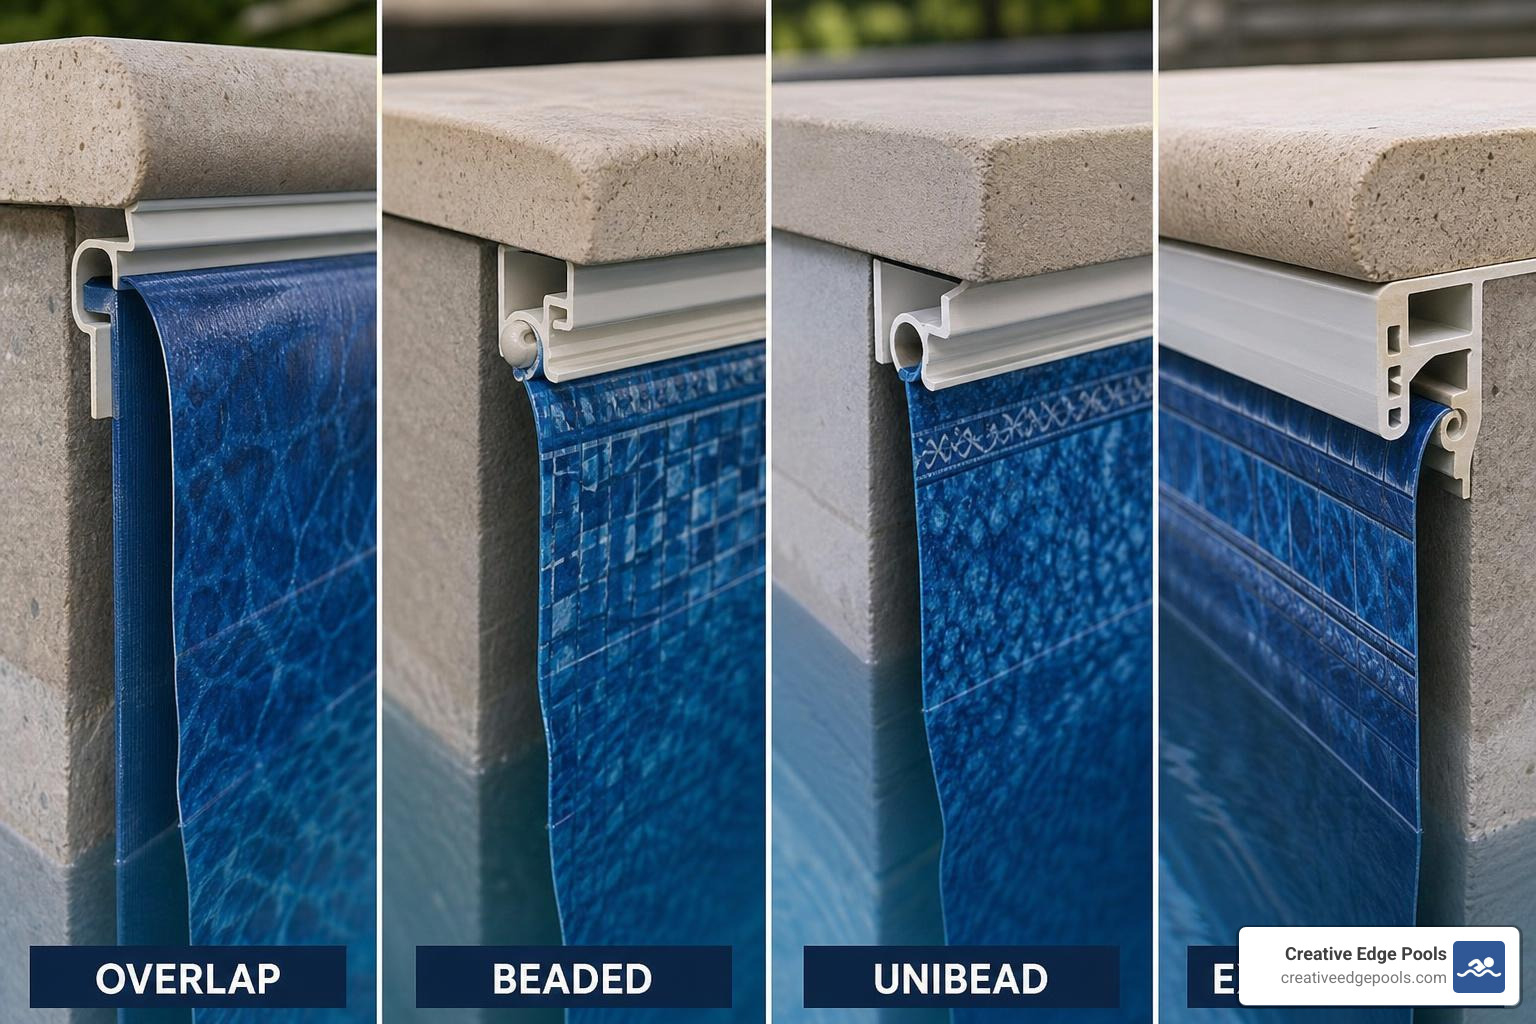
Overlap, Beaded, Unibead/J-Hook, and Expandable Liners
Choosing the wrong attachment type is one of the easiest ways to turn a simple project into a very expensive vinyl burrito. Here is the practical difference.
| Liner type | Where it is common | How it attaches | Best for | Watch out for |
|---|---|---|---|---|
| Overlap | Above-ground pools | Drapes over the wall and is held with coping strips | Budget-friendly replacements | Less tailored appearance; excess vinyl must be adjusted evenly |
| Beaded | Above-ground and inground pools | Snaps into a bead receiver track | Clean finish and easier future replacement | Requires compatible track |
| Unibead/J-Hook | Above-ground pools | Hooks over the wall or converts to beaded use | Flexible replacement option | Must confirm wall height and attachment setup |
| Expandable | Above-ground pools | Designed to stretch into a deeper center or deep end | Above-ground pools with non-flat bottoms | Needs careful base prep and positioning |
Beaded liners usually create the cleanest finish because the liner locks into a track. Overlap liners are common and economical, but they require even tension around the entire pool. Unibead liners are popular because they can often work as a J-hook or beaded liner, depending on the pool.
Is Lining a Pool With Vinyl Possible Over Fiberglass or Plaster?
Sometimes, yes, but it is not a casual upgrade. Installing vinyl over an existing fiberglass or plaster pool requires a professional assessment.
A successful conversion usually needs:
- A sound pool shell with no major structural movement
- A smooth substrate with no sharp edges
- Retrofit liner track around the pool perimeter
- Compatible drain, return, light, and skimmer fittings
- New faceplates, gaskets, and seals
- Careful treatment around steps, benches, and curves
- A custom liner pattern and measurement process
The biggest concerns are leak risk, warranty limits, and fitting compatibility. Fiberglass and plaster pools were not originally built to hold a vinyl liner, so the waterproofing details around drains, returns, and steps must be handled carefully.
In some cases, resurfacing or a broader pool renovation may make more sense. In others, a vinyl conversion can be practical if the shell is suitable. We evaluate this case by case across Eastern MA and Southern NH.
When Replacement Beats Repair
A patch can buy time. It cannot reverse aging vinyl.
Replacement usually beats repair when you see:
- Cracks above the waterline
- Brittle or stiff vinyl
- Severe fading or pattern loss
- Bead slippage from the track
- Wrinkles that keep growing
- Distorted liner patterns from stretching
- Repeated leaks
- More than a few patches in one area
- Rusted wall panels or visible wall damage
- Unexplained water loss beyond normal evaporation
A leaking liner can lose significant water daily in warm weather, especially if the tear is hidden behind a wrinkle or near a fitting. Waiting too long can damage walls, floors, and panels, turning a liner project into a structural repair.
If the issue is small and the liner is still flexible, repair may be reasonable. Start with our guides on how to repair a vinyl pool liner and pool liner leak repair.
Measuring, Tools, and Site Preparation for a Proper Fit
A liner only fits as well as the measurements behind it. Even a high-quality liner can wrinkle, stretch, pull out of the track, or leak if the pool is measured incorrectly.
In New England, we also pay close attention to groundwater and weather. A drained pool in a wet spring is not something to ignore, especially near coastal or low-lying areas around Portsmouth, NH, Dover, NH, and Exeter, NH.
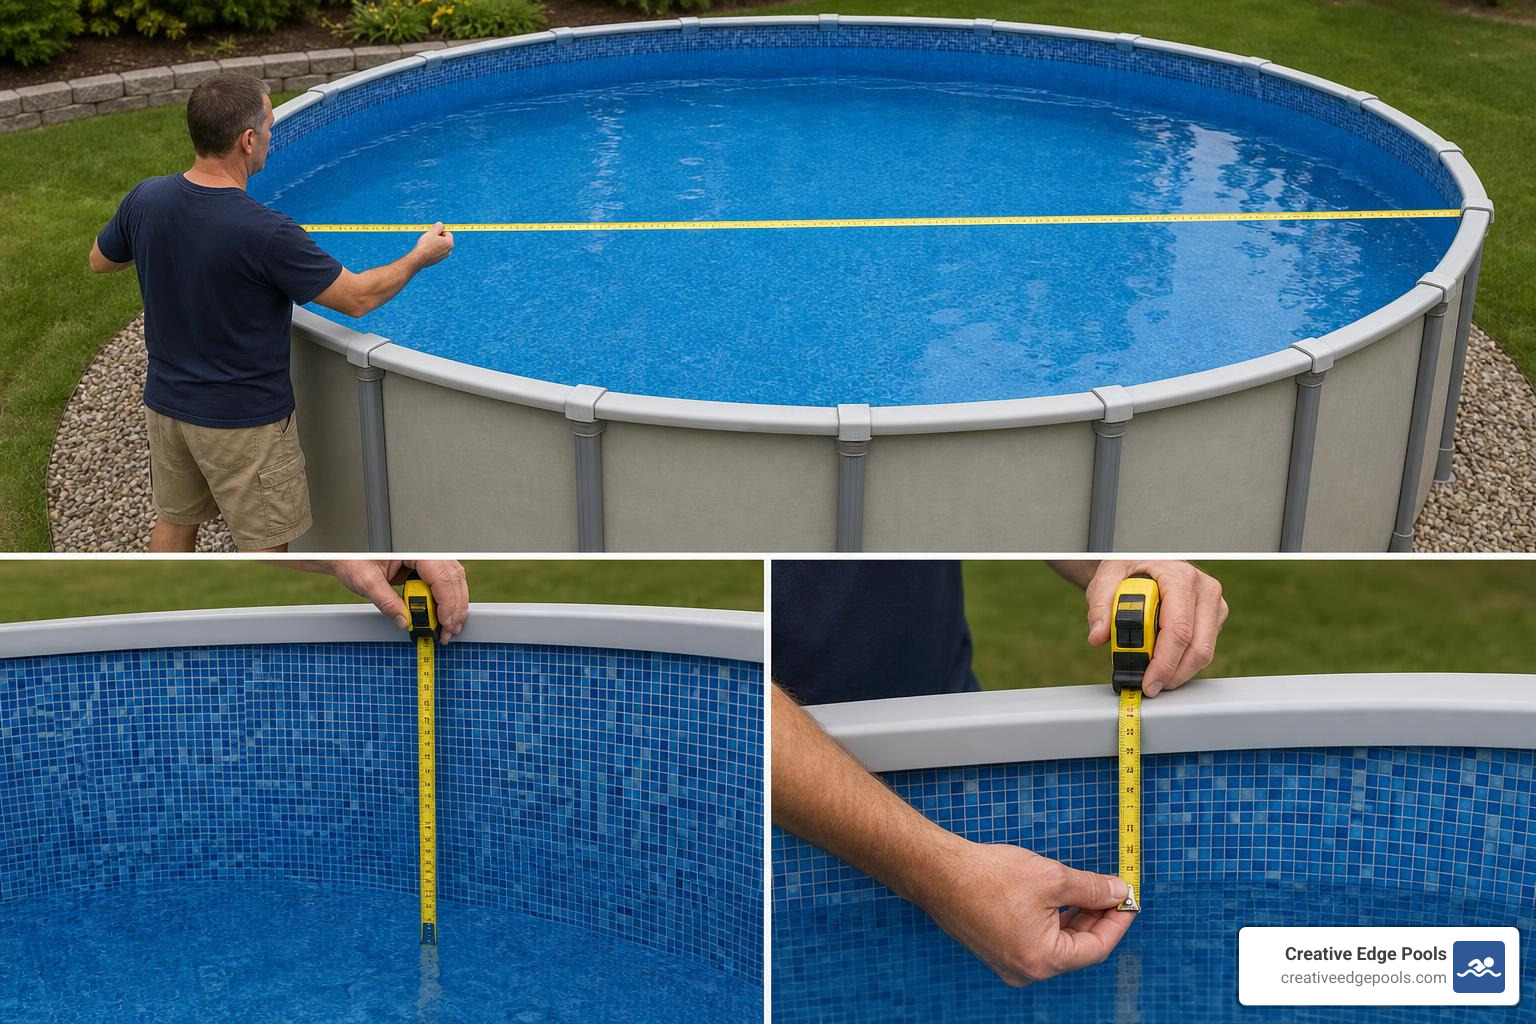
How to Measure for a Replacement Pool Liner
For above-ground pools, measure:
- Inside diameter or inside length and width
- Wall height from floor to top rail
- Pool shape
- Bottom type: flat, dished, or expandable
- Attachment style: overlap, beaded, unibead, or J-hook
For inground pools, measurements are more detailed. A proper custom measurement may include:
- Inside wall-to-wall dimensions
- Shallow end depth
- Deep end depth
- Break point location
- Hopper width and length
- Slope lengths
- Corner radius
- Step and bench dimensions
- Track location
- Main drain and fitting locations
- A-B plot measurements for freeform pools
A-B measuring uses two fixed reference points to map curves, steps, and irregular shapes. It is especially important for kidney, lagoon, and custom pools.
For complex shapes, we strongly recommend professional measurement and custom fabrication. Learn more about custom inground pool liners.
Tools, Materials, and Preparation Needed
Professional liner installation involves more than a pump and crossed fingers. Typical tools and materials include:
- Submersible pump
- Shop vacuum or liner vacuum
- Garden hose or water delivery plan
- Screwdrivers and nut drivers
- Utility knife
- Non-asphalt duct tape
- Soft broom
- New gaskets
- New faceplates when needed
- Wall foam
- Floor pad
- Mason sand or vermiculite repair material
- Tamping tools
- Rust treatment products
- Temporary safety barriers
- Clean socks or soft footwear for walking on the liner
Preparation is where long-term success begins. The pool must be drained safely, the old liner removed, and the shell inspected. Rust, sharp edges, loose wall seams, floor divots, and washed-out sand or vermiculite should be corrected before the new liner goes in.
When to Hire a Professional Instead of DIY
We keep DIY advice high-level because liner replacement is one of those jobs that looks easier on video than it feels when you are standing in an empty pool holding 300 pounds of vinyl.
Hire a professional when the pool has:
- An inground liner
- Custom steps or benches
- A deep end or hopper
- Main drains
- Lights
- Multiple returns
- Structural wall concerns
- Rust or panel damage
- Vermiculite or base repairs
- High groundwater risk
- Cold or unpredictable weather
- Warranty-sensitive materials
Above-ground DIY liner replacement can save money in some cases, but inground liner replacement is usually best left to trained installers. One measurement error, early cut, reused gasket, or missed wrinkle can shorten the liner’s life.
For a clearer look at what professionals do, see our pool liner replacement process.
Step-by-Step Pool Liner Replacement Process
The exact workflow depends on pool type, but the core sequence is the same: drain, remove, inspect, repair, pad, position, vacuum, fill, cut, seal, and balance.
Technical instructions from liner manufacturers also stress warm installation conditions, careful vacuum use, and waiting until the water level is close to fittings before cutting openings. You can review additional technical inground liner installation instructions.
Above-Ground Pool Liner Installation: Professional Workflow
A professional above-ground liner replacement generally follows this order:
- Drain the pool completely.
- Remove top rails, coping strips, or bead components as needed.
- Remove the old liner.
- Inspect walls for rust, dents, sharp screws, or damaged seams.
- Treat rust and cover sharp areas.
- Repair and compact the sand base.
- Form or inspect the cove around the inside wall.
- Add wall foam or floor padding if specified.
- Warm and unfold the liner carefully.
- Center the liner with seams aligned properly.
- Attach the liner using the correct overlap, bead, or J-hook method.
- Use a shop vacuum to remove trapped air.
- Begin filling slowly while smoothing wrinkles.
- Install faceplates and fittings only when water reaches the correct level.
- Apply safety labels and complete final inspection.
Some technical above-ground instructions recommend waiting until the pool has enough water to lock the liner in place before cutting skimmer and return openings. For more detail, see these technical above-ground liner installation instructions.
Inground Vinyl Liner Installation: Professional Workflow
Inground liner replacement is more exacting because the liner is custom made to fit the pool shell.
A professional workflow often includes:
- Lower or drain the pool safely while monitoring groundwater.
- Remove faceplates, gaskets, fittings, and the old liner.
- Inspect wall panels, coping, bead receiver, stairs, and the pool bottom.
- Patch vermiculite, grout, or floor imperfections.
- Tape seams and cover sharp edges.
- Install wall foam or floor padding where appropriate.
- Position the liner, usually starting from the deep end.
- Lock the bead into the receiver.
- Set vacuum hoses behind the liner and seal openings.
- Pull the liner tight with vacuum pressure.
- Adjust alignment before adding significant water.
- Install the main drain faceplate at the correct water depth.
- Continue filling.
- Cut returns, skimmers, and lights only when water is near each fitting.
- Install new gaskets and faceplates.
- Balance water chemistry.
For a deeper look at this process, visit our guide to replacing an inground pool liner.
Lining a Pool Without Wrinkles, Leaks, or Premature Failure
Wrinkles and leaks usually come from rushing. The liner needs warmth, alignment, vacuum pressure, and patience.
Best practices include:
- Install when temperatures are around 70 degrees F or warmer.
- Store the liner at room temperature before installation when possible.
- Use enough people to handle the liner without dragging or stretching it.
- Never use sharp tools to force a bead into track.
- Do not cut openings too early.
- Replace gaskets instead of reusing old ones.
- Keep the base smooth and free of stones or debris.
- Use vacuum pressure to remove air behind the liner.
- Watch groundwater conditions before draining.
- Confirm bead alignment before the pool gets heavy with water.
Once several inches of water are in the pool, wrinkles become much harder to move. At that point, the water is basically saying, “This is where I live now.”
Lifespan, Thickness, Timeline, and Cost Expectations in 2026
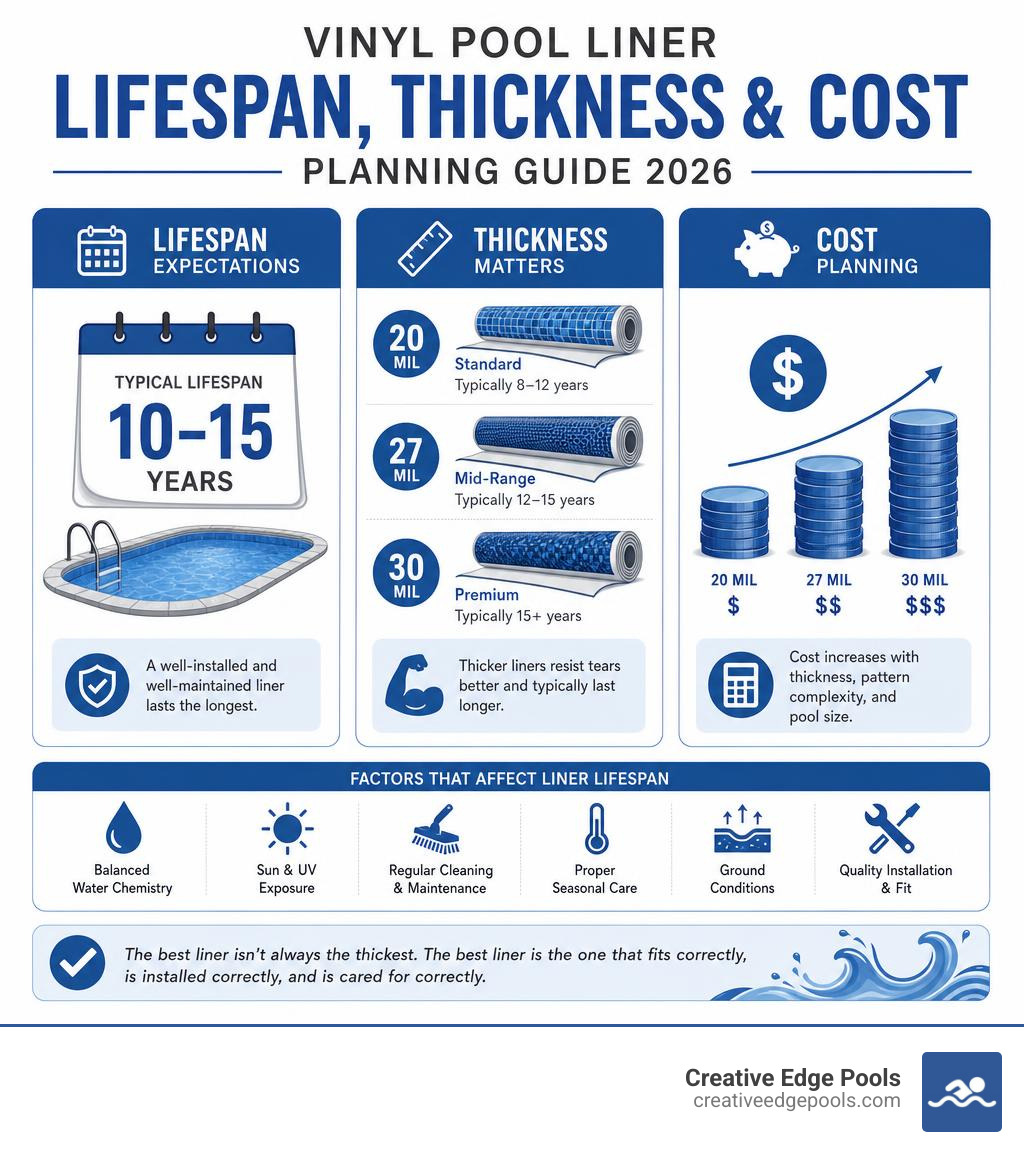
As of 2026, vinyl liner projects vary widely based on pool type, liner thickness, site conditions, labor, repairs, and features. The best liner is not always the thickest liner. The best liner is the one that fits correctly, is installed correctly, and is cared for correctly.
How Long a Vinyl Pool Liner Lasts
A typical vinyl pool liner lasts 10 to 15 years when installed well and maintained properly. A standard 20-mil liner often lasts about 8 to 12 years with balanced water chemistry.
Factors that affect lifespan include:
- Water chemistry
- UV exposure
- Liner thickness
- Vinyl quality
- Installation quality
- Winterization
- Water level management
- Frequency of use
- Pets, toys, and sharp debris
- Harsh cleaning tools
- High chlorine or low pH
Low pH can make vinyl brittle. High chlorine can bleach patterns. UV exposure is hardest on the area above the waterline because submerged vinyl gets some protection from the water.
For more detail, read how long a vinyl pool liner lasts.
Choosing 20 Mil, 27 Mil, 28-30 Mil, or Thicker Vinyl
Liner thickness is measured in mils, not inches. One mil equals one-thousandth of an inch. Be careful with “gauge” because it is not always used consistently across products.
Common choices include:
- 20 mil: Flexible, common, and cost-effective. Often suitable for many residential pools.
- 27 mil: More puncture resistance and durability, often used for upgraded inground liners.
- 28-30 mil: Heavier-duty option for pools with more use, debris exposure, or higher durability needs.
- Thicker specialty liners: May be used for specific commercial-style or high-wear applications, but fit and flexibility must be considered.
Thickness can improve puncture resistance, but it does not overcome poor chemistry or poor installation. A properly installed 20-mil liner with balanced water can outlast a thicker liner exposed to low pH, excessive chlorine, or constant UV abuse.
Average Pool Liner Replacement Cost Ranges
Important pricing note: the following ranges are based on broad industry averages and publicly available online data. They are not Creative Edge Pools prices, quotes, guarantees, or estimates. Actual project costs vary based on pool size, access, repairs, liner selection, site conditions, and scope.
Because online averages often understate real-world variability, we use wide planning ranges:
| Pool type | Broad 2026 planning range from public online data | What affects cost |
|---|---|---|
| Above-ground liner replacement | $2,400-$17,500 | Size, wall height, liner type, base repair, wall repair, labor, water handling |
| Inground vinyl liner replacement | $6,000-$40,000 | Custom liner, steps, benches, deep end, fittings, wall repairs, base repairs, gaskets, labor |
Cost drivers include:
- Liner thickness
- Pool size
- Pool shape
- Custom steps or benches
- Main drain work
- New gaskets and faceplates
- Wall foam or floor padding
- Rust or panel repairs
- Vermiculite or sand base repairs
- Water delivery
- Access constraints
- Manufacturing lead time for custom liners
For more planning information, review our pool liner replacement cost guide and our guide to the cost of replacing an inground vinyl pool liner.
How Long Liner Replacement Takes
A professional inground liner replacement commonly takes 1 to 3 days once the liner is on site and conditions are right. Above-ground projects may be faster, but repairs can extend the timeline.
Factors that affect schedule include:
- Weather
- Pool size
- Pool shape
- Deep end complexity
- Steps, benches, lights, and drains
- Groundwater
- Rain delays
- Wall or base repairs
- Custom liner manufacturing lead time
- Water source or water delivery timing
- Startup and filtration needs
In Massachusetts and New Hampshire, spring scheduling fills quickly. If your liner is already brittle or slipping out of track in Wilmington, MA, Andover, MA, Portsmouth, NH, or Dover, NH, it is smart to plan before peak swim season.
Maintenance, Troubleshooting, and Common Pool Lining Mistakes
A new liner is not “set it and forget it.” It is more like a good pair of shoes: treat it well, keep it clean, and do not attack it with sharp objects.
Startup Water Chemistry and First 14 Days
The first two weeks matter. Fresh fill water should be balanced carefully and gradually.
A good startup order is:
- Test source water.
- Adjust total alkalinity first.
- Adjust pH to about 7.4-7.6.
- Adjust calcium hardness according to liner and equipment needs.
- Add stabilizer/cyanuric acid if using chlorine.
- Maintain free chlorine around 2-4 ppm after startup.
- Brush gently with a vinyl-safe brush.
- Run filtration continuously at first, often for 24-48 hours.
- Test frequently.
Avoid letting undissolved shock or chlorine sit directly on the liner. It can bleach or damage the vinyl. Never toss tablets into the pool and let them rest on the floor.
Maintenance Practices That Extend Liner Life
To extend liner life:
- Keep pH stable.
- Avoid prolonged low pH.
- Avoid over-chlorination.
- Use a soft brush, not abrasive tools.
- Maintain proper water level.
- Repair leaks quickly.
- Protect the waterline from oils and grime.
- Use a proper winter cover.
- Avoid sharp toys, metal tools, and rough vacuum heads.
- Inspect fittings and gaskets seasonally.
- Manage leaves and debris before they stain.
- Open and close the pool correctly for the MA/NH climate.
If a small issue appears, repair it before it spreads. See our resources on liner pool repair and underwater vinyl pool glue.
Common Installation Mistakes to Avoid
Avoid these liner-killing mistakes:
- Ordering the wrong size
- Choosing the wrong attachment type
- Measuring outside dimensions instead of inside dimensions
- Ignoring wall height
- Reusing old gaskets
- Cutting skimmer or return openings too early
- Installing vinyl when it is too cold
- Skipping rust repair
- Leaving stones, roots, or rough spots under the liner
- Forgetting wall foam or padding where needed
- Failing to use vacuum pressure
- Overstretching the liner
- Installing over an old liner
- Draining an inground pool during high groundwater conditions
- Using sharp tools near the vinyl
- Filling too fast before wrinkles are corrected
- Ignoring bead alignment
Installing a new liner over an old liner is strongly discouraged. It hides damage, creates fit issues, traps water or debris, and can interfere with proper sealing around fittings.
Frequently Asked Questions About Pool Liners
Can I patch a liner instead of replacing it?
Yes, if the vinyl is still flexible and the damage is small. If the liner is brittle, heavily faded, leaking repeatedly, or patched in multiple nearby spots, replacement is usually smarter. A pool liner repair kit for vinyl may help with minor damage.
What causes a liner to float or bubble?
Usually groundwater pressure. If water builds up under the liner, it can push the liner away from the floor or walls. This is common after heavy rain or snowmelt and should be handled carefully.
How soon can I swim after liner replacement?
Wait until the pool is filled, the filtration system is running, fittings are sealed, and water chemistry is safe and balanced. In many cases, that means waiting at least until startup testing confirms proper sanitizer and pH levels.
How do I dispose of an old liner?
Old vinyl liners are heavy and often need to be cut into manageable sections. Disposal rules vary by municipality in Massachusetts and New Hampshire. Do not burn vinyl.
Does homeowners insurance cover liner replacement?
Sometimes, but usually only when damage comes from a covered event. Wear, age, fading, poor maintenance, or chemical damage are commonly excluded. Check your policy.
Are saltwater pools safe for vinyl liners?
Yes, saltwater systems can be compatible with vinyl liners when chemistry is managed properly. Saltwater pools still produce chlorine, so pH and sanitizer levels must be monitored.
Why does fading happen above the waterline first?
The area above the waterline gets more direct UV exposure and less protection from water. Chemical residue at the waterline can also accelerate fading.
Do dark liners heat the water?
Darker liners may absorb more sunlight and can slightly warm pool water, but they may also show fading or scale differently than lighter patterns.
Conclusion
Lining a pool the right way is about more than making the water look pretty. It protects the structure, prevents leaks, improves safety, and helps your pool perform for the next decade or more.
The keys are simple:
- Choose the right liner system.
- Measure accurately.
- Prep the walls and base.
- Replace gaskets.
- Install in the right weather.
- Use vacuum pressure to remove air.
- Cut fittings only when the water level is correct.
- Balance chemistry from day one.
At Creative Edge Pools, we are a family-owned pool company serving Eastern Massachusetts and Southern New Hampshire with over 100 years of combined experience in pool design, installation, renovation, and backyard development. From Portsmouth, NH, Dover, NH, and Exeter, NH to Wilmington, MA and Andover, MA, we help homeowners make smart pool renovation decisions that protect their investment.
Have questions about liner replacement, pool renovation, excavation, hardscaping, masonry, or a larger backyard upgrade?
Call us at +978-203-0406 or request a quote.
You can also review pool liner replacement costs before planning your project.