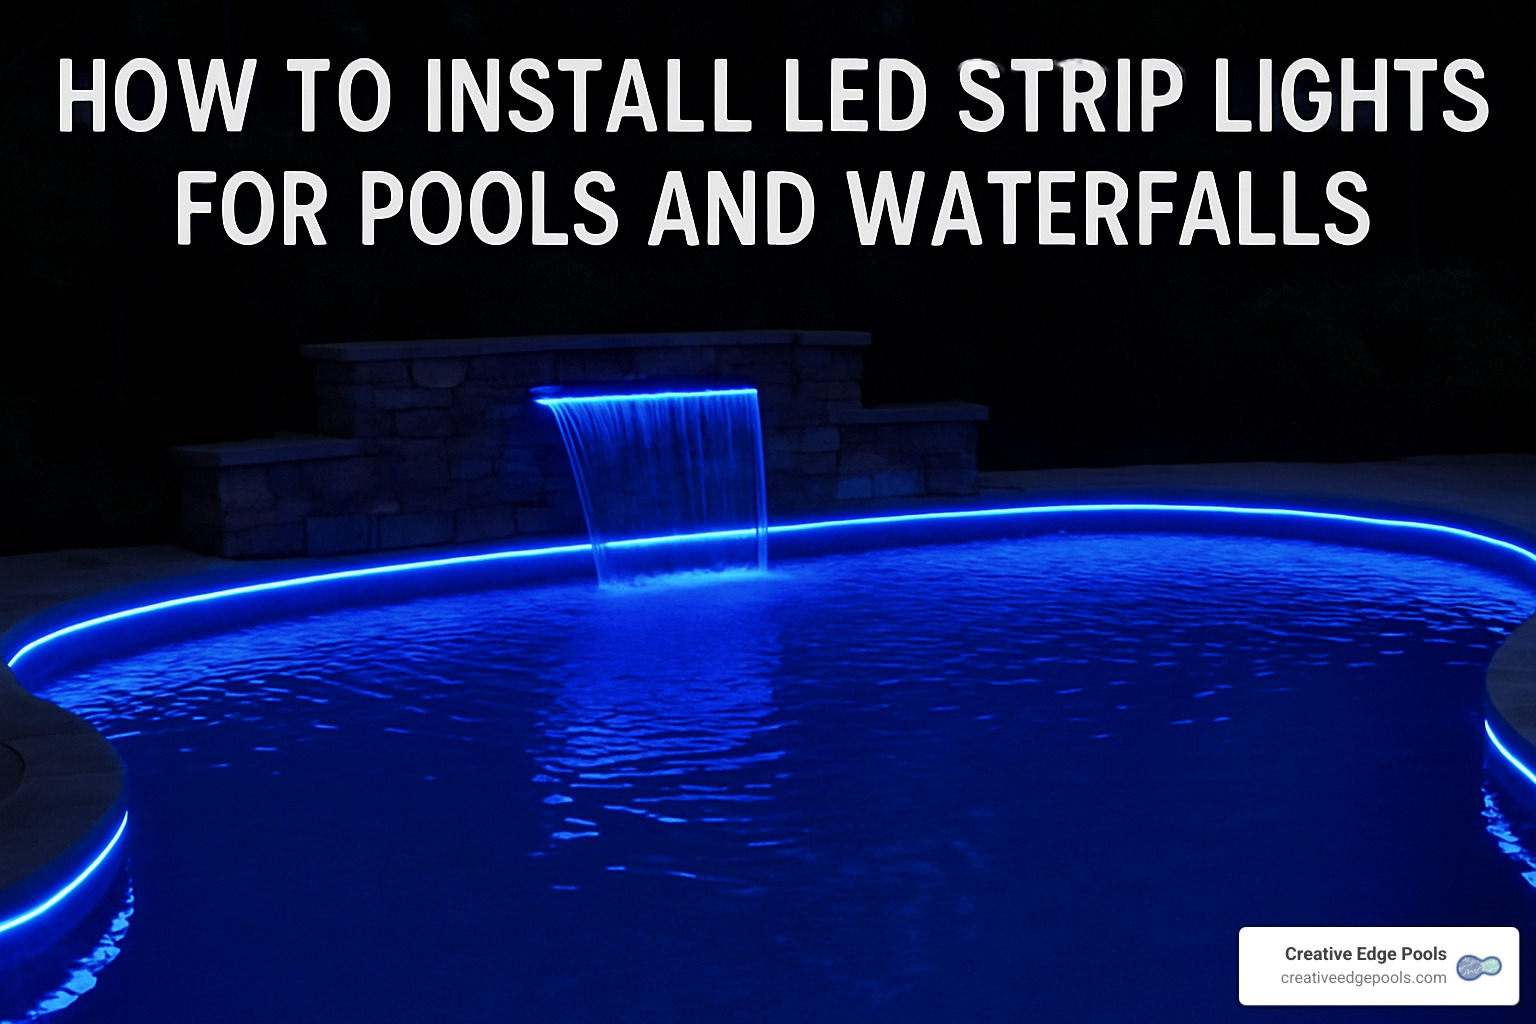
How to Install Led Strip Lights for Pools and Waterfalls: 7 Powerful Steps for Stunning Results 2025
Transform Your Pool and Waterfall with LED Strip Lighting
If you’re looking for how to install led strip lights for pools and waterfalls, here’s a quick overview of the process:
- Choose the right LED strips – Select IP68-rated strips for underwater use, IP67 for splash zones
- Gather necessary tools – Waterproof connectors, silicone sealant, mounting clips, low-voltage transformer
- Plan your layout – Measure areas and map out power source locations
- Install safely – Use GFCI protection and keep connections above water when possible
- Mount and secure – Attach strips using mounting clips or outdoor-rated adhesive
- Waterproof connections – Seal all joints and endpoints with marine-grade silicone
- Test before finalizing – Verify operation before completing installation
LED strip lights have revolutionized pool and waterfall lighting, offering dramatic effects with 80% greater energy efficiency than traditional lighting. These versatile, low-voltage options can transform your backyard oasis into a captivating nighttime retreat, enhancing both safety and ambiance.
I’m David Brabant, owner of Creative Edge Pools, and with over thirty years in the swimming pool industry, I’ve installed countless LED lighting systems for pools and waterfalls, helping homeowners create magical outdoor environments that extend their enjoyment well into the evening hours.
Choosing & Planning Your LED Strip Lighting Setup
Picking the perfect LED strips for your pool and waterfall isn’t just about grabbing whatever’s on sale at the hardware store. Think of it like choosing the right ingredients for your favorite recipe – get it right, and the results will be magical!
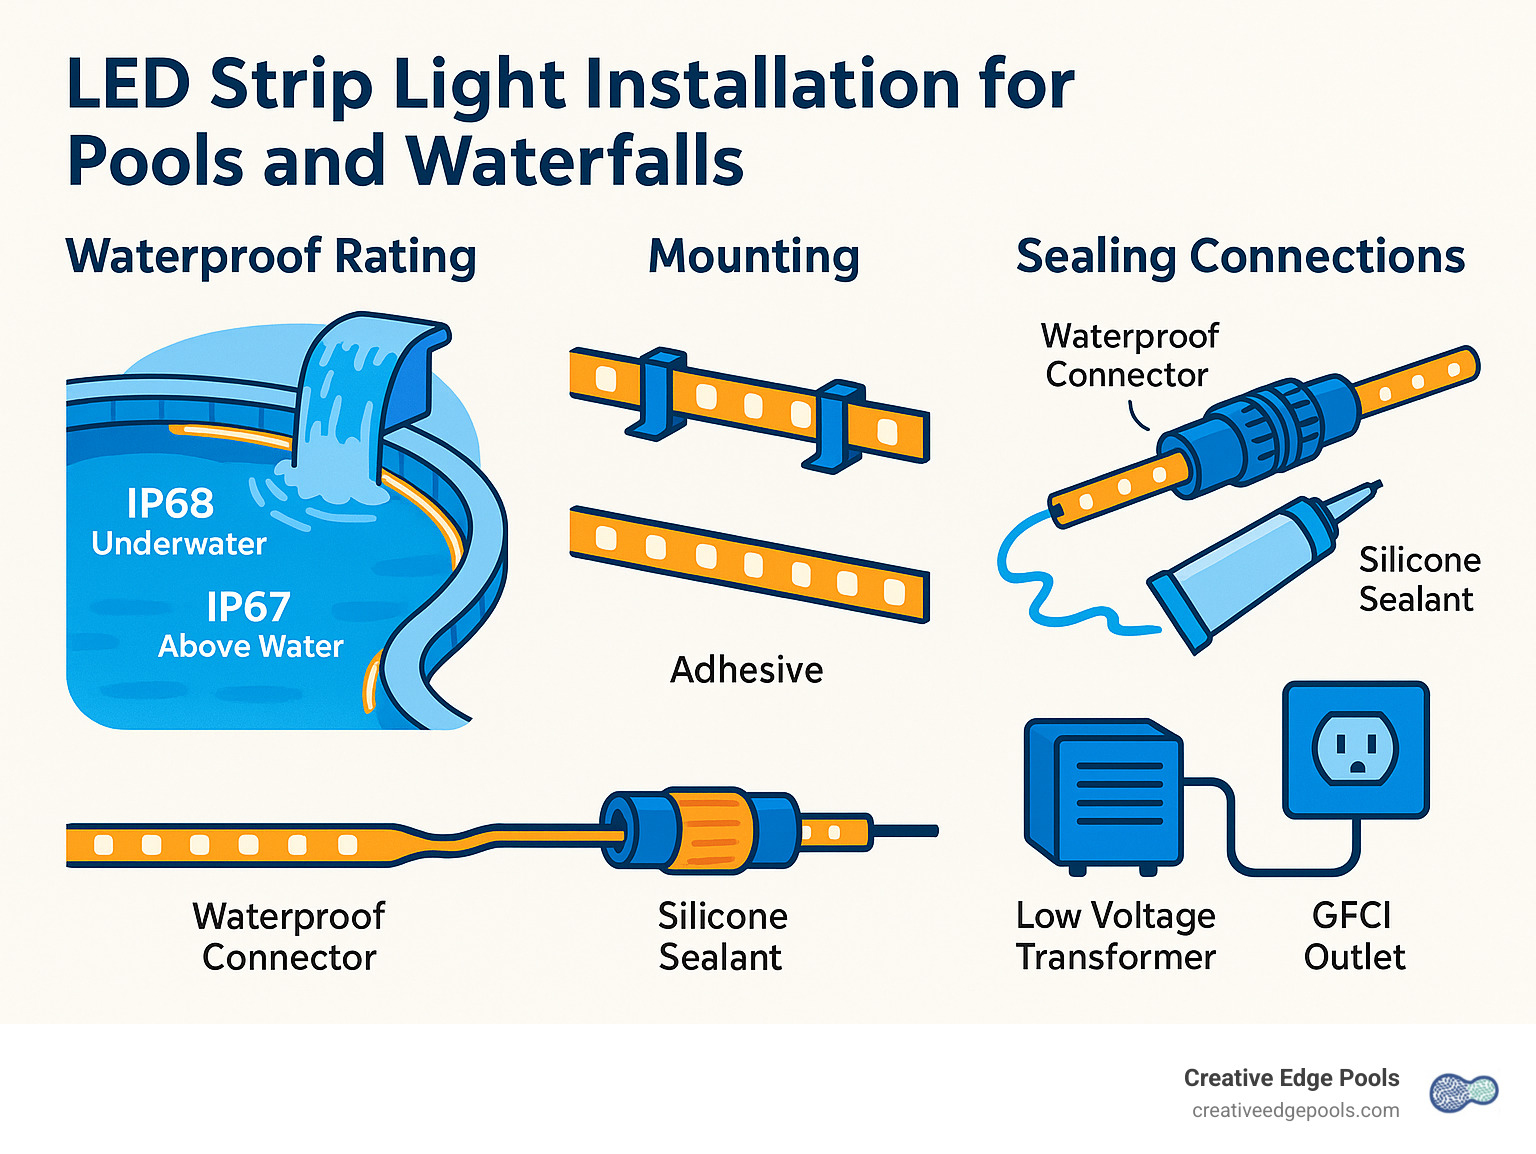
Waterproof Ratings Explained
Water and electricity have a famously complicated relationship, which is why understanding IP (Ingress Protection) ratings is your first step to success:
| Rating | Protection Level | Suitable For |
|---|---|---|
| IP65 | Protected against low-pressure water jets | Dry areas near pools (covered patios) |
| IP67 | Protected against temporary immersion (up to 30 min) | Splash zones, rain exposure |
| IP68 | Protected against continuous submersion | Underwater installation, waterfalls |
When we’re installing LED strip lights for pools and waterfalls at Creative Edge, we follow a simple rule: IP68-rated strips for anything going underwater, IP67-rated strips for splash zones, and we never use anything less than these ratings near water. Your family’s safety and your investment’s longevity depend on getting this right!
You can learn more about the science behind these ratings in the official IP code documentation.
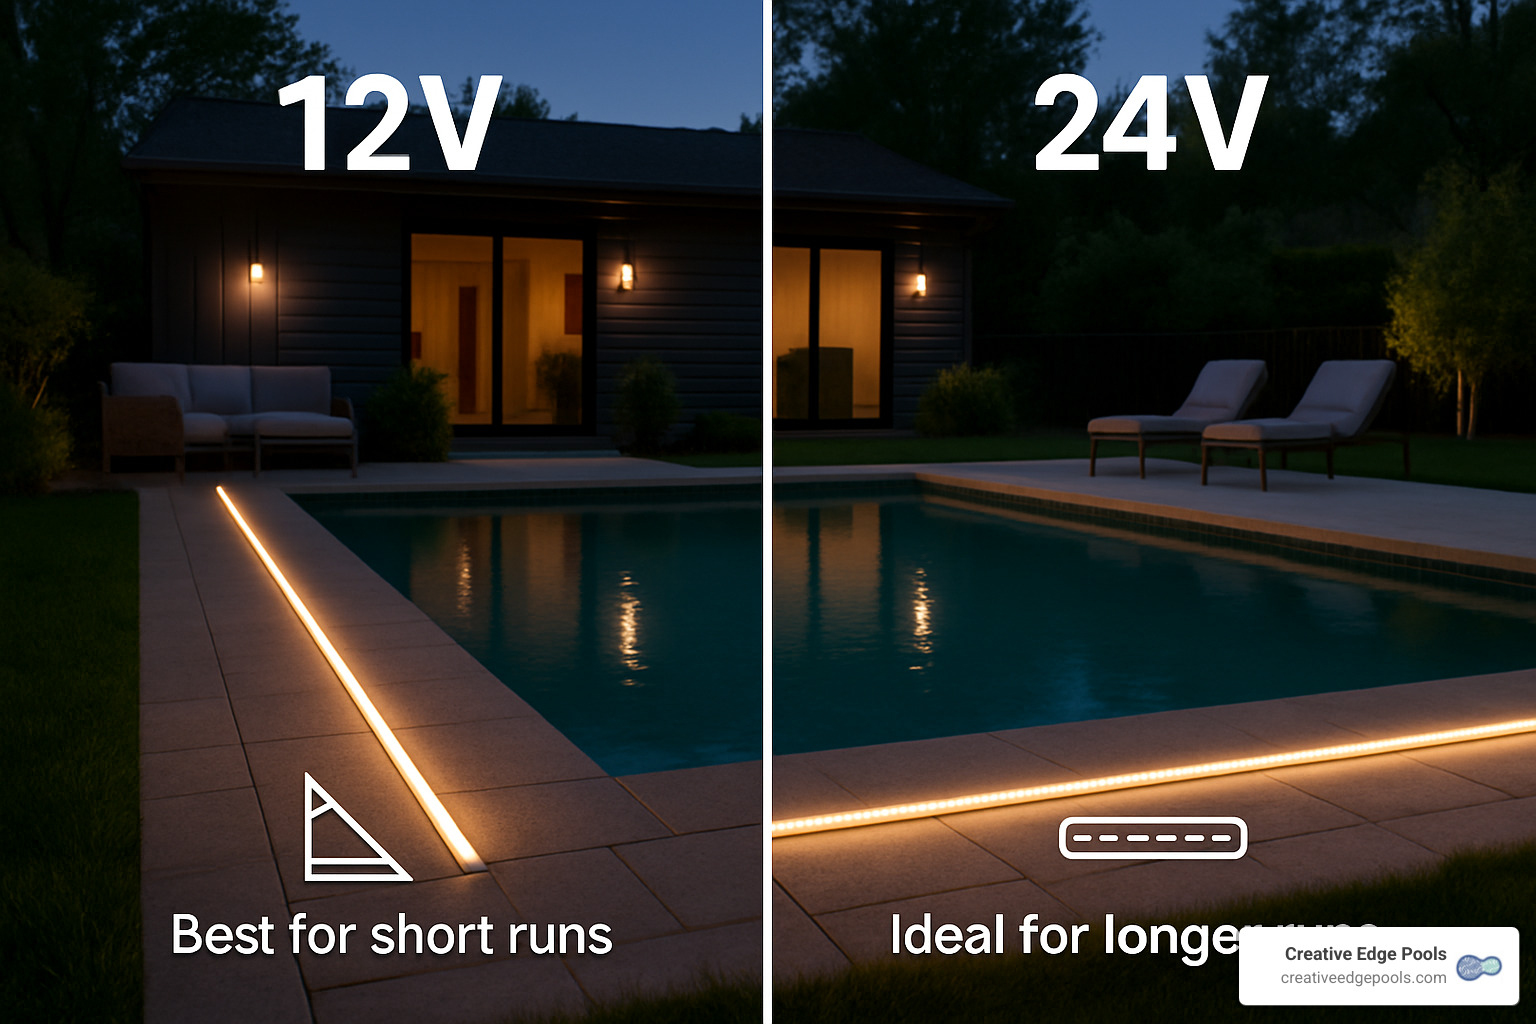
Voltage Considerations: 12V vs 24V
Both options work for pool applications, but they have different strengths:
12V Systems feel like the friendly neighborhood option – easier to find and slightly safer. They’re perfect for smaller setups where your lights won’t run more than about 30 feet.
24V Systems are like the more sophisticated cousin – they handle longer distances without dimming (thanks to reduced voltage drop) and maintain consistent brightness throughout. For most of our pool and waterfall projects, we recommend going with 24V for the best results.
Brightness and Color Options
Think about brightness like you would the intensity of your pool’s pump – you need enough power to get the job done! LED brightness is measured in lumens per meter:
Standard brightness (300-600 lumens/meter) works for accent lighting, but underwater, it’s like whispering in a noisy room – barely noticeable. High brightness (800-1200 lumens/meter) is our typical recommendation for pools, giving you that perfect glow without being blinding. For dramatic waterfall effects, sometimes we’ll use ultra-bright options (1500+ lumens/meter) to really make the water sparkle.
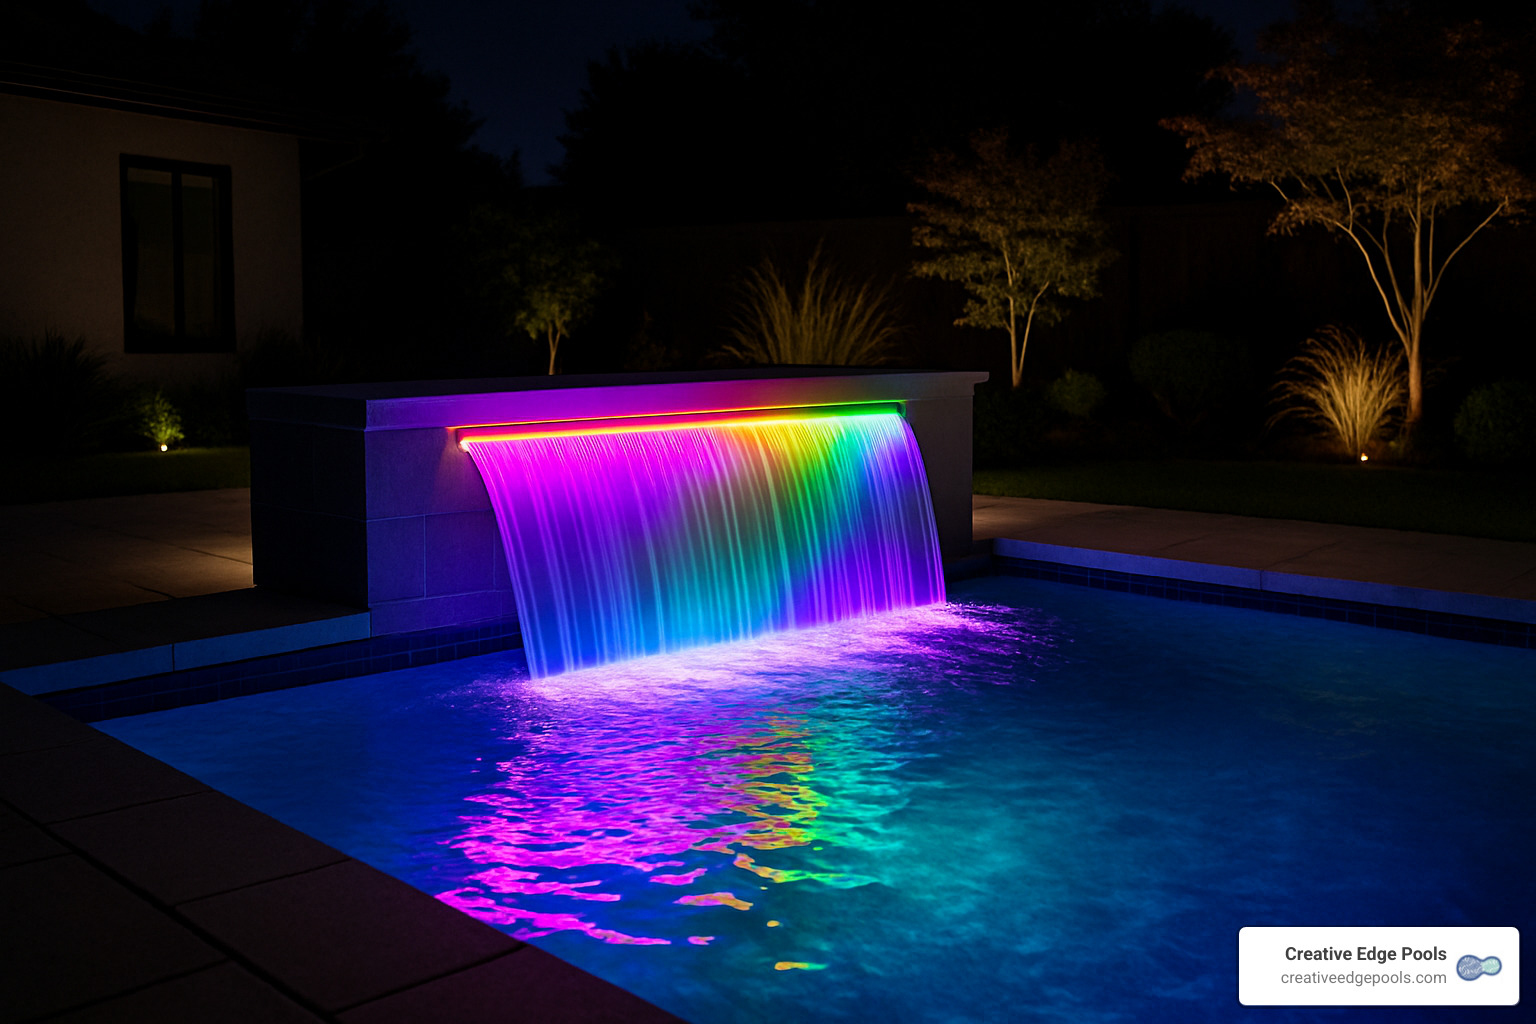
As for colors, you’ve got wonderful options! Single color strips keep things simple, while RGB lets you mix red, green, and blue to create a rainbow of effects. My personal favorite for waterfalls? RGBW or RGBWW strips that include dedicated white LEDs alongside colors – they create the most natural-looking light when you want it, and the most vibrant colors when you’re in a festive mood.
Mounting Channels and Diffusers
While not mandatory, aluminum channels are like sunscreen for your LED strips – they might seem optional until you realize how much protection they provide! They shield your investment from physical damage, help dissipate heat (extending LED lifespan), and create a more polished look by diffusing those individual LED “dots” into a smooth ribbon of light.
For waterfalls especially, channels with clear diffusers transform the lighting from “obvious technology” to “magical glow.” Worth every penny for that professional finish!
Mapping Aesthetic Goals & Safety Zones
Color Psychology for Pool and Waterfall Lighting
The colors you choose will dramatically affect the mood of your outdoor space. Cool white creates a modern, refreshing atmosphere – perfect for contemporary designs. Warm white feels cozy and inviting, ideal for traditional settings. Blue is the classic pool color that makes water look deeper and more inviting, while green creates that tropical lagoon feeling we all love from vacation resorts.
When we’re designing lighting for clients, we often recommend programmable options that allow you to switch between practical white light for swimming and colorful displays for entertaining.
Strategic Placement for Maximum Impact
Light placement is an art form! For waterfalls, we position strips to illuminate the moving water rather than the structure – this highlights the dancing patterns and creates that mesmerizing effect everyone loves. For safety, we always recommend step illumination to prevent nighttime accidents.
One of my favorite techniques is mounting strips under the pool coping for a floating effect that makes your pool look like it’s hovering in your backyard! For those lucky enough to have a vanishing edge, highlighting that seamless transition with LED strips creates a truly spectacular nighttime view.
Safety Considerations
Beauty is important, but safety is non-negotiable. All pool and waterfall lighting must comply with National Electrical Code (NEC) Article 680, which includes GFCI protection for all circuits, UL-listed transformers specifically rated for pool use, and proper distance requirements (junction boxes at least 4 feet from the pool edge, transformers at least 5 feet away).
At Creative Edge Pools, we’re sticklers for these safety standards – we want your family enjoying that beautiful lighting for years to come without worry!
For more inspiration on integrating your lighting with your overall landscape design, check out our guide to Backyard Pool Landscaping for creative ideas that complement your new LED installation.
How to Install LED Strip Lights for Pools and Waterfalls
Now that you understand the planning phase, let’s dive into the actual installation process for how to install led strip lights for pools and waterfalls. As someone who’s installed hundreds of these systems, I can tell you that careful preparation makes all the difference between a stunning display and a frustrating repair job down the road.
Tools & Materials Checklist for how to install led strip lights for pools and waterfalls
Before you roll up your sleeves, gather everything you’ll need. Trust me, there’s nothing worse than being halfway through an installation and realizing you’re missing a crucial component!
For tools, you’ll want wire cutters/strippers, a silicone applicator gun, and a heat gun for those heat-shrink tubes. Don’t forget a multimeter for testing connections – this little device has saved me countless headaches. You’ll also need a drill with appropriate bits, scissors for cutting your LED strips (only at the marked points!), and a good measuring tape.
As for materials, your shopping list should include IP68-rated LED strip lights (accept nothing less for underwater use), waterproof connectors, and marine-grade silicone sealant. Heat-shrink tubing with a 3:1 ratio and adhesive lining is essential for proper sealing. You’ll also need a low-voltage transformer (12V or 24V), mounting clips or aluminum channels, and outdoor-rated wiring.
Don’t skimp on safety components like waterproof junction boxes, GFCI protection, dielectric grease, waterproof wire nuts, and cable ties to keep everything neat and organized.
Step-by-Step Process: how to install led strip lights for pools and waterfalls
1. Preparation and Safety
Safety first, always! Turn off all power to your work area before you begin. I can’t stress this enough – water and electricity don’t mix, so take every precaution.
Start by measuring and marking all your installation locations. This simple step will save you time and frustration later. Then thoroughly clean all surfaces where you’ll mount the strips. They must be completely dry and free of oils, sunscreen residue, or pool chemicals – all enemies of adhesive.
Before permanent installation, connect and test your LED strips. Nothing’s more disappointing than completing a complex installation only to find a defective strip!
2. Installing the Power Supply
Your transformer is the heart of the system, so place it wisely. Mount it in a dry, protected location at least 5 feet from the pool edge – this isn’t just good practice, it’s required by electrical code.
Always connect to a GFCI-protected circuit. This isn’t optional – it’s essential for safety and code compliance. If you need to make connections in potentially wet areas, install a waterproof junction box. Then run conduit from your transformer to where your LED strips will go. This extra step protects your wiring and makes future maintenance much easier.
3. Mounting LED Strips
For pools, start with a dry-fit to confirm your placement. Nothing beats seeing the strips in position before committing. Then apply mounting clips every 12-18 inches, or use aluminum channels for a cleaner look and better protection.
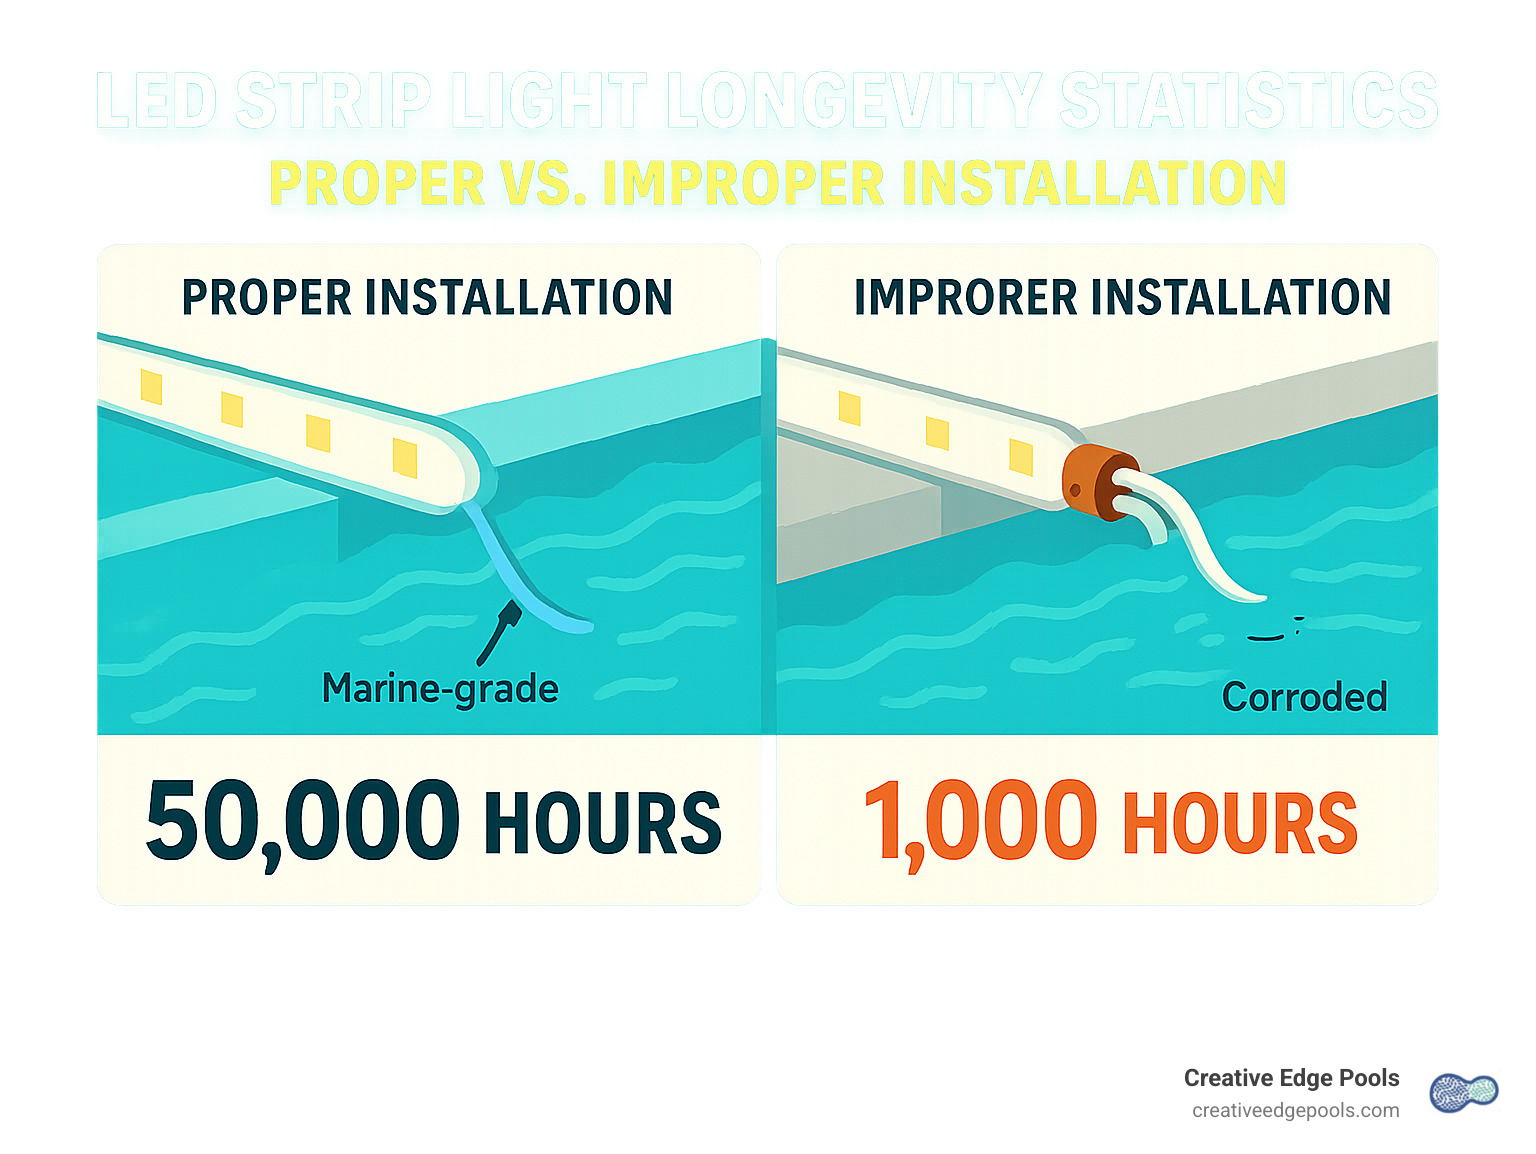
Underwater applications absolutely require IP68-rated strips. Whenever possible, keep connections above water level – this single tip can double the lifespan of your installation. Secure your strips using clips, channels, or waterproof adhesive designed for underwater use.
For waterfalls, position strips to highlight the moving water rather than the structure itself. The magic happens when light catches those cascading droplets! Mount strips behind or under the waterfall lip for the most dramatic effect. For sheer descents, place strips along the top edge, while natural waterfalls look best with strips hidden among rocks. I’ve found that aluminum channels with diffusers create the most professional, even lighting effect.
4. Wiring and Connections
Protect your wiring by running low-voltage lines through conduit – especially important in areas with foot traffic or landscaping equipment. Make connections using proper waterproof connectors, not regular wire nuts with tape (a mistake I see far too often).
Avoid underwater splices whenever possible. When they’re unavoidable, use only marine-grade waterproof connectors designed specifically for submersion. The extra cost is negligible compared to the headache of troubleshooting a failed connection later.
5. Testing and Finishing
Before finalizing everything, test your system thoroughly. Check for voltage drop across long runs – if the far end of your strip seems dimmer, you may need to adjust your wiring configuration. For RGB strips, verify all colors work properly.
Make any final adjustments to positioning while everything is still accessible. Then secure all wiring with cable ties or clips to prevent movement that could stress connections over time.
Waterproofing Connections & Endpoints
This step makes or breaks your installation when learning how to install led strip lights for pools and waterfalls. I’ve seen beautiful installations fail within weeks because of poor waterproofing.
Always use IP68-rated connectors specifically designed for underwater use. Before joining connections, apply dielectric grease to prevent water migration. Seal connections with adhesive-lined heat-shrink tubing (3:1 ratio provides the best compression). Then apply marine-grade silicone over these connections for a double layer of protection.
For cut ends, use waterproof end caps or silicone potting compound. I recommend double-sealing critical connections with both heat-shrink and silicone – it takes just a few extra minutes but can prevent hours of troubleshooting later.
The most important tip: allow all sealants to cure fully before exposing to water. Read the manufacturer’s instructions carefully – some silicones need 24-48 hours to cure properly.
A waterproofing system is only as strong as its weakest point. One poorly sealed connection can doom your entire installation, so take your time with this step!
Power, Wiring & Smart Control Essentials
Getting the power and wiring right isn’t just about making your lights work—it’s about keeping your pool area safe and making sure those beautiful lights keep shining night after night. Let’s break this down into manageable pieces.
Selecting the Right Transformer
Think of your transformer as the heart of your lighting system. To choose the right one, first calculate how much power you’ll need by multiplying the length of your LED strips by their watts-per-meter rating. Then add about 20% extra as a buffer—this gives your system room to breathe and extends the life of your components.
Always select a UL-listed transformer specifically rated for pool and spa use. These have been tested for safety in wet environments, which is crucial when water and electricity are in the mix. If you want to control brightness levels, opt for a dimmable transformer, and make sure it comes in a weather-resistant housing to stand up to the elements.
Understanding Voltage Drop
Have you ever noticed how Christmas lights sometimes look dimmer at the far end of the string? That’s voltage drop in action, and it’s something you’ll need to manage in your how to install led strip lights for pools and waterfalls project.
For 12V systems, try to keep your runs under 10 meters (about 33 feet). If you’re using 24V systems, you can stretch a bit further to around 15 meters (50 feet). But here’s a pro tip: for longer installations, don’t create one continuous run. Instead, wire sections in parallel from your transformer—like multiple branches from a tree trunk rather than one long branch.
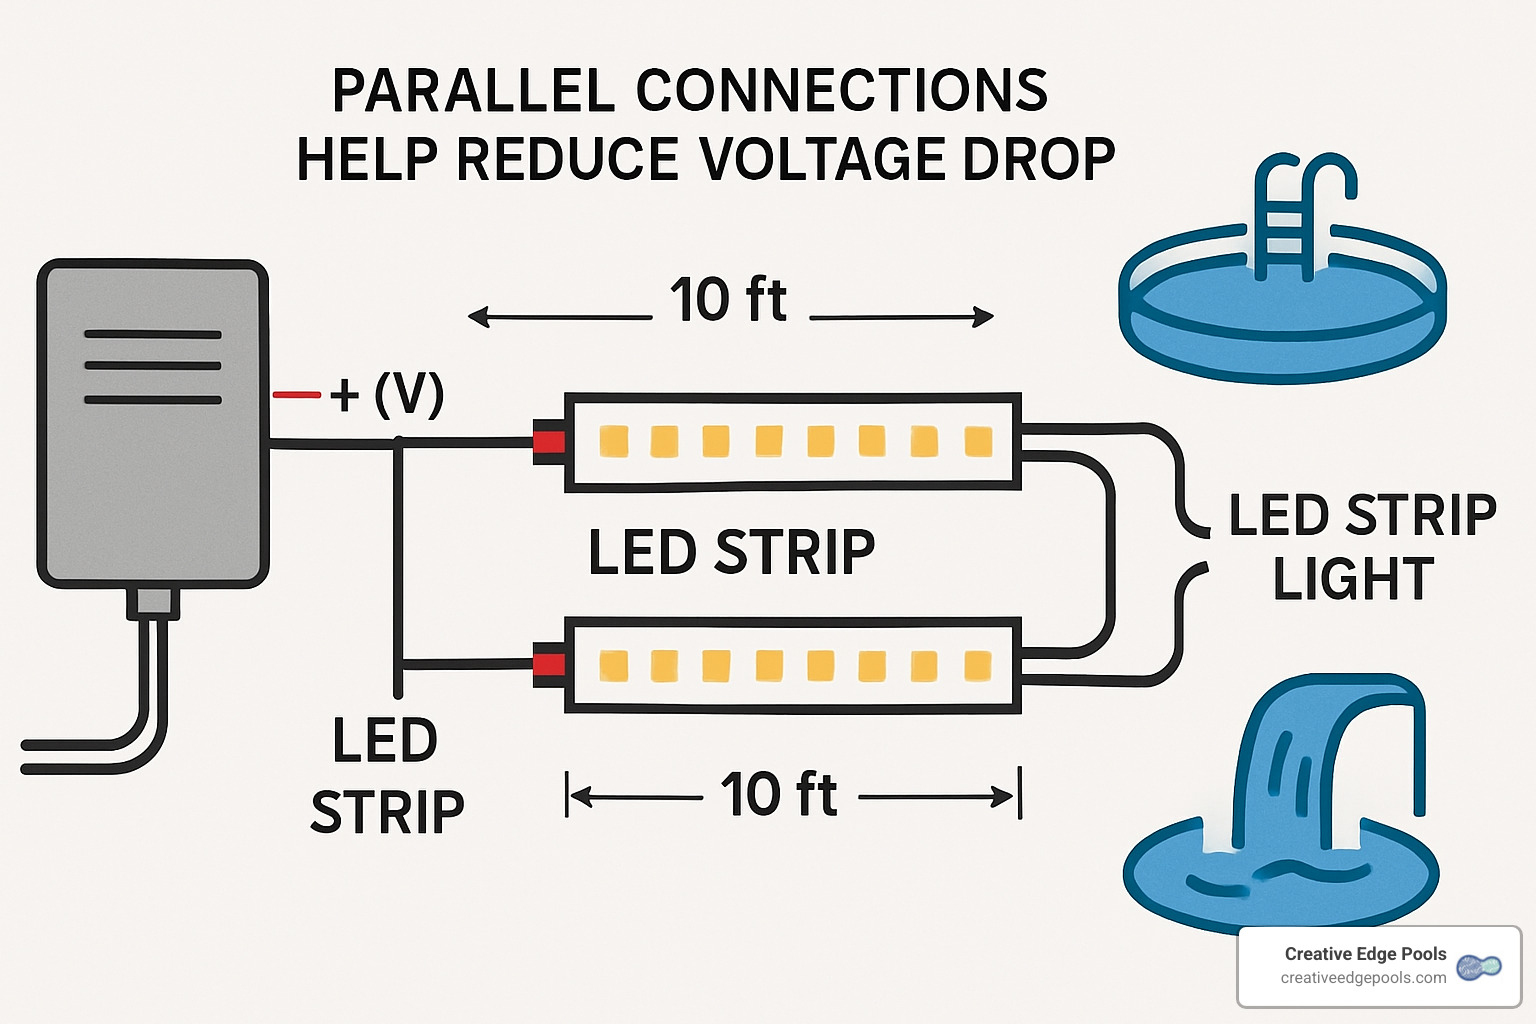
Wiring Best Practices
When it comes to wiring, thicker is better for longer runs—14 AWG or 12 AWG wire will carry current more efficiently with less voltage drop. Always run your wires through conduit for protection from the elements and potential damage.
Whenever possible, keep your electrical connections above water level. This simple step dramatically reduces the risk of water infiltration. Use waterproof junction boxes for all connections, and take a minute to label all your wires—your future self will thank you when it’s maintenance time!
Integrating With Pool Automation
Here’s where the magic really happens—turning your pool and waterfall lighting into a smart, responsive system that you can control with a tap or even your voice.
The simplest option is an IR remote controller that gives you basic control over colors and brightness. Step up to WiFi controllers, and you can manage everything from your smartphone. For professional-grade control with complex lighting sequences, DMX controllers are the way to go. And if you’re building a smart home, look for Zigbee or Z-Wave compatible controllers that will integrate with your existing system.
With the right controller, you can enable voice commands through Amazon Alexa or Google Home, set schedules for automatic operation, create scene presets for different occasions, synchronize your lights with other pool features, and even program weather-based automation—imagine your lights automatically turning on during an evening rain shower!
At Creative Edge Pools, we’ve had great success with the Smart Sync LED Waterfall Adapter for waterfall installations. It creates beautiful synchronization between multiple water features, giving your backyard a cohesive, professional look.
When programming your lighting system, start with simple colors and scenes before working up to more complex patterns. Create themed presets for different occasions like family swims, romantic evenings, or pool parties. Lighting needs change with the seasons as daylight hours shift, so adjust accordingly. For the most pleasing effects, program gradual transitions rather than jarring changes, and be sure to set up default “evening ambiance” and “night swim” modes for everyday use.
Looking to expand your pool area with complementary features? Check out our guide to Pool Hardscapes for ideas on how to integrate your lighting with other elements of your backyard oasis.
Maintenance, Troubleshooting & Creative Lighting Ideas
Let’s face it – your beautiful LED strip installation deserves some TLC to keep shining bright for years to come. With a little regular attention, those mesmerizing lights will continue to transform your pool and waterfall night after night.
Routine Maintenance
Think of maintaining your LED strips like caring for any other part of your pool – a little prevention goes a long way. I recommend doing a quick visual inspection monthly, just scanning for any signs of water getting where it shouldn’t or any physical damage to the strips. About once every three months, gently clean any exposed strips with a soft cloth and non-abrasive cleaner – nothing harsh that might damage the waterproof coating.
Once a year, take a closer look at all those connection points. They’re the most vulnerable parts of your system, so check that your waterproofing seals are still intact. While you’re at it, test your GFCI protection monthly by simply pressing that test button – it takes seconds but could prevent a serious safety issue. Also keep an eye out for any corrosion at connection points, especially in saltwater pools where it tends to happen more quickly.
Common Troubleshooting
When your magical underwater light show starts to dim or flicker, don’t panic! This is usually something simple to fix. First, check the input voltage at your transformer with a multimeter, then measure it again at the end of the strip. A significant difference indicates voltage drop. Look closely for loose connections – they’re often the culprit. Water finding its way into the system can also cause dimming, as can incorrect controller settings.
If entire sections of your lighting have gone dark, check whether you’ve accidentally cut through a circuit trace rather than at a designated cut point. Test the connections between sections, look for any physical damage to the strip itself, and verify your power supply has enough capacity to run the entire installation.
For those frustrating color issues – like when your blue looks more purple or colors won’t change properly – try resetting your controller to factory settings. Check all your RGB connections, as a loose wire can affect specific colors. If your controller has updateable firmware, make sure it’s current, or try testing with a different controller to determine whether the issue lies with the strips or the control system.
Creative Lighting Ideas
Now for the fun part! Your pool and waterfall can become an ever-changing canvas of light with some creative programming. One of my personal favorites is setting up color-changing waterfalls with gradual transitions that highlight the movement of the water – it’s mesmerizing to watch the colors slowly shift from cool blues to warm ambers.
Consider creating underwater pathways along your pool floor to guide swimmers and add depth, or install strips under the coping for a floating effect that makes your pool appear to hover above the ground at night. For the ultimate party setup, synchronize your lighting with your outdoor audio system.
Floating LED orbs can complement your fixed strips beautifully, adding movement to your lighting design as they drift across the surface. And don’t stop at the water’s edge – extending your lighting design to surrounding landscaping creates a cohesive look that transforms your entire backyard into a resort-like retreat. For more ideas on enhancing your pool area, check out our guide on Things to Put Around Your Pool.
Frequently Asked Questions about LED Strips in Wet Environments
Why are my lights dimming after a few weeks?
This common issue usually points to one of three culprits. First, voltage drop might be your problem if only the sections farthest from the power source are dimming. The solution? Use thicker gauge wires, upgrade from 12V to 24V strips, or wire your setup in parallel rather than series.
If the dimming appears in random spots, you’re likely dealing with water ingress – moisture has found its way into your strip or connections. You’ll need to locate the affected areas and reseal them properly.
The third possibility is connector corrosion, especially if you used standard connectors rather than marine-grade ones. Pool chemicals can be harsh on electrical components, so replacing with proper marine-grade connectors and sealing them correctly is your best course of action.
Can I cut and re-seal IP68 strips safely?
Yes, you absolutely can – but proceed with caution! Only cut at the marked cut points (usually indicated by a scissors icon or line every few LEDs). Use proper end cap kits designed specifically for your strip model and apply dielectric grease before sealing to prevent water migration.
Always use marine-grade silicone to seal the end cap – regular silicone won’t stand up to pool chemicals. And patience is key – allow a full 24 hours of curing time before exposing your newly sealed end to water. Each cut creates a potential failure point, so minimize cuts whenever possible in your design.
How long do LED strips last under water?
With proper installation and maintenance, you can expect impressive longevity from quality LED strips. The LEDs themselves typically last 50,000+ hours – that’s over 5 years of continuous use! However, the real-world waterproof lifespan in pool environments usually ranges from 3-5 years for quality installations.
Several factors affect how long your underwater lighting will last. Water chemistry plays a major role – high chlorine levels will reduce lifespan, as will extreme water temperatures. The quality of your initial installation, particularly the seals at connections and cut points, makes an enormous difference. Of course, the hours of daily use and the quality of your components also factor into the equation.
To maximize the lifespan of your how to install led strip lights for pools and waterfalls project, maintain proper pool chemistry and make it a habit to inspect those seals regularly. A little attention now means many more years of beautiful illuminated evenings by your pool!
Conclusion & Next Steps
The magic of LED strip lighting transforms ordinary pools and waterfalls into enchanting nighttime retreats. There’s something truly special about watching the gentle glow illuminate cascading water or seeing the soft light dance across your pool’s surface as evening falls.
When you’ve completed your how to install led strip lights for pools and waterfalls project, you’ll enjoy years of beautiful, energy-efficient illumination that completely changes how you experience your outdoor space after dark. The best part? These lighting systems use just a fraction of the energy of traditional pool lighting while offering so much more versatility.
Remember these essential points for lasting success with your installation:
Safety always comes first – GFCI protection isn’t just recommended, it’s absolutely necessary to protect your family and friends. Electrical codes exist for good reason, and following them carefully prevents potential hazards.
Quality components make all the difference – I’ve seen too many homeowners try to save a few dollars on bargain LED strips only to replace the entire system a year later. Invest in genuine IP68-rated strips and connectors from reputable suppliers – your future self will thank you!
Take your time with waterproofing – Those extra minutes spent carefully sealing connections will pay dividends for years. A properly sealed connection can last for many seasons, while a rushed job might fail after the first heavy rain.
Thoughtful design improves your entire space – Consider how light interacts with water, stone, and landscaping elements. Strategic placement creates both practical illumination and stunning visual effects that highlight your pool’s best features.
Regular check-ups keep everything glowing – Just like any part of your pool system, periodic inspection prevents small issues from becoming big problems. A quick monthly visual check and occasional cleaning will maintain your lighting’s beauty and function.
At Creative Edge Pools, we’ve helped countless homeowners throughout Eastern Massachusetts and Southern New Hampshire create stunning outdoor environments where lighting plays a crucial role in the overall experience. Our approach combines technical expertise with an artistic eye to ensure your pool and waterfall lighting improves your entire backyard vision.
Looking for more inspiration? Our guide to inground pool waterfalls showcases beautiful ways to incorporate water features into your design. For comprehensive outdoor changes, explore our Backyard Pool Landscaping and Pool Hardscapes services that create cohesive living spaces where lighting becomes an integral design element.
While many homeowners with basic electrical knowledge successfully tackle DIY lighting installation, professional help ensures optimal results and code compliance. Our team is always happy to discuss your vision and help bring it to life – whether you’re adding lighting to an existing pool or planning an entirely new backyard oasis.
Ready to see your pool and waterfall in a whole new light? Let’s create something beautiful together!
