How to Build a Gunite Pool: 8 Essential Steps in 2024
Introduction
How to build a gunite pool may seem daunting, but with the right steps and guidelines, it becomes manageable. Here’s a quick overview:
- Design and layout: Choose your pool’s shape and features.
- Get permits: Secure necessary local permits.
- Excavation: Dig the pool area.
- Install plumbing and electrical systems.
- Rebar installation: Set up the steel framework.
- Gunite application: Spray and cure the mixture.
- Tile and coping installation.
- Decking and landscaping.
- Finish and fill the pool.
Ready to dive deeper? Let’s explore each step in detail.
Hello, I’m David Brabant, owner of Creative Edge Pools. With over 30 years of hands-on experience, I specialize in how to build a gunite pool and transforming backyards into paradises. Let’s make your dream pool a reality.

Understanding Gunite Pools
Definition
A gunite pool is a type of swimming pool made from a mixture of cement, sand, and water. This mixture is sprayed over a steel framework, creating a strong and durable pool shell. The term gunite refers to the dry-mix process where water is added at the nozzle during spraying.
Composition
Gunite is essentially dry concrete. The dry mix of cement and sand is transported to the construction site, where it is combined with water and sprayed onto the pool structure using a high-pressure hose. This method ensures a smooth and even application, which is crucial for the pool’s structural integrity.
History
The concept of gunite originated in the early 20th century. It was invented by Carl Akeley, who initially used it to repair the facade of the Field Columbian Museum in Chicago. The technique quickly gained popularity for its strength and versatility, leading to its adoption in pool construction.
By the 1930s, gunite had become a standard material for building swimming pools. Its ability to be molded into any shape made it a favorite among homeowners and commercial developers. Today, gunite pools are known for their durability and flexibility in design, making them a top choice for custom pool projects.
Next, let’s delve into the planning and permits required for building a gunite pool.
How to Build a Gunite Pool: Planning and Permits
Design
The first step in how to build a gunite pool is creating a detailed design. At Creative Edge Pools, we start by listening to your vision. Our team gathers all your requirements and preferences, then transforms them into a 3D design. This helps you visualize the final product and make any necessary adjustments before construction begins.
Gunite pools offer incredible flexibility. Whether you want a freeform pool with a waterfall or a sleek rectangular pool with an infinity edge, we can bring your dream to life. The design phase is crucial because it sets the foundation for all subsequent steps.
Local Permits
Once the design is finalized, the next step is obtaining the necessary permits. Building a pool involves multiple regulations and codes that vary by location. These permits ensure your pool meets all safety and zoning requirements.
At Creative Edge Pools, we handle the permit application process for you. Our team is familiar with local regulations in Eastern Massachusetts and Southern New Hampshire, making the process smoother and quicker. We schedule an appointment with site inspectors who evaluate whether your land qualifies for pool construction.
Site Inspection
Before any digging begins, a site inspection is essential. This step involves evaluating the soil type, landscape, and any potential obstacles that could affect construction. A thorough site inspection helps avoid surprises during the excavation phase.
During the inspection, our experts will:
- Assess the soil type to determine if any special measures are needed.
- Check for underground utilities to prevent any accidental damage.
- Evaluate the landscape to plan for proper drainage and stability.
The site inspection ensures that the construction process will be as smooth as possible, minimizing delays and unexpected costs.
Next, we will discuss the essential materials and tools required for gunite pool construction.
Essential Materials and Tools for Gunite Pool Construction
Building a gunite pool is a complex process that requires the right materials and tools. Here’s a breakdown of what you’ll need:
Rebar
Rebar (short for reinforcing bar) is crucial for the structural integrity of your pool. It forms the skeleton of the pool and ensures that the gunite adheres properly.
- Material: Typically made of steel, rebar comes in various thicknesses.
- Installation: The rebar is bent and tied into a grid pattern that matches the shape of the pool.
Tip: Make sure the rebar is installed correctly to avoid any future structural issues.
Gunite
Gunite is a mixture of cement, sand, and water applied through a high-pressure hose. It’s the core material that forms the pool’s shell.
- Application: Gunite is sprayed onto the rebar framework. This process requires skilled operators to ensure even application.
- Curing: After application, the gunite needs to cure for about 28 days to achieve maximum strength.
Note: Proper curing is essential to prevent cracks and ensure durability.
Plumbing
A gunite pool’s plumbing system is responsible for water circulation, filtration, and heating.
- Materials: PVC pipes are commonly used for their durability and ease of installation.
- Components: Essential parts include drain lines, skimmers, and return jets.
Advice: Consult with your contractor to design an efficient plumbing system that meets your pool’s needs.
Electrical
Electrical components are vital for the pool’s functionality and safety.
- Wiring: Proper electrical wiring is required for lighting, pumps, and heaters.
- Safety: It’s crucial to follow local electrical codes to ensure safety.
Reminder: Always hire a licensed electrician to handle the electrical work.
Now that you have an understanding of the essential materials and tools, let’s dive into the step-by-step guide to building a gunite pool, starting with the design and layout.
Step-by-Step Guide to Building a Gunite Pool
Step 1: Design and Layout
The first step in building a gunite pool is to design the layout. Your pool’s design should reflect your personal preferences and the unique characteristics of your yard.
3D Designs: At Creative Edge Pools, we utilize advanced 3D design software to create a visual representation of your pool. This allows you to see exactly how your pool will look before construction begins. Adjustments can be made easily at this stage to ensure the final design meets your expectations.
Customization: Gunite pools offer incredible flexibility in terms of shape and size. Whether you want a simple rectangular pool or a complex design with waterfalls and tanning ledges, gunite can accommodate your vision.
Step 2: Excavation
Once the design is finalized, the next step is excavation. This involves digging out the area where the pool will be installed.
Machinery: Heavy machinery like backhoes and excavators are used to dig the pool. The type and size of machinery will depend on the pool’s dimensions and the complexity of the landscape.
Soil Type: The type of soil in your yard can affect the excavation process. Sandy soil is easier to dig, while clay or rocky soil may require more time and specialized equipment.
Safety: Safety is crucial during excavation. Proper shoring and bracing techniques are used to prevent the walls from collapsing. Always ensure that the worksite is clear of unauthorized personnel during this phase.
Step 3: Plumbing and Electrical Installation
With the excavation complete, the next step is to install the plumbing and electrical systems.
Safety: Proper installation of plumbing and electrical systems is essential for the pool’s safety and functionality. Always hire experienced professionals to handle these tasks.
Efficiency: Efficient plumbing systems ensure that water circulates properly, which is crucial for maintaining clean and balanced water. Electrical systems must be installed according to local codes to ensure safety.
Longevity: High-quality materials and proper installation techniques contribute to the longevity of your pool’s plumbing and electrical systems.
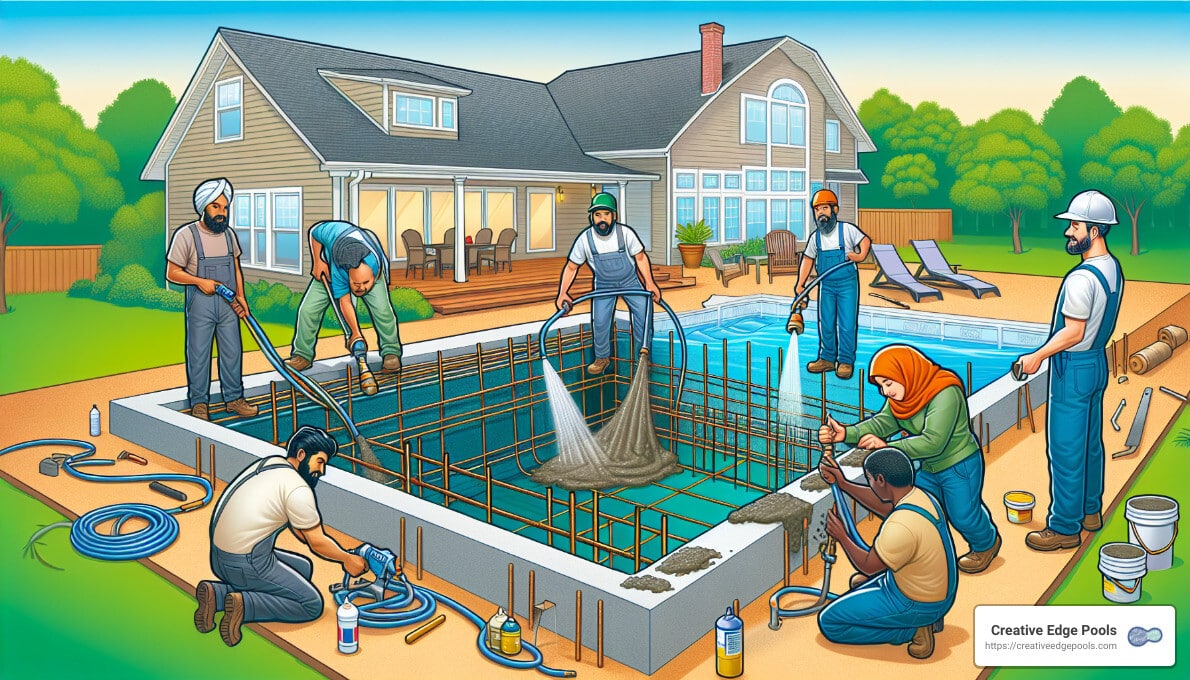
Step 4: Rebar Installation
Rebar (reinforcing steel bars) is installed to provide structural integrity to the pool.
Structural Integrity: The rebar forms a steel framework that supports the gunite. It’s crucial to install rebar correctly to prevent structural issues in the future.
Techniques: Rebar is typically installed in a grid pattern, with bars spaced evenly across the pool’s surface. This creates a strong framework that can withstand the pressure of the gunite and water.
Step 5: Applying Gunite
The next step is to apply the gunite, which forms the pool’s shell.
Nozzle Technique: Gunite is applied using a high-pressure hose. The mixture of sand, cement, and water is sprayed onto the rebar framework, creating a solid shell.
Curing Process: After application, the gunite needs to cure for at least 28 days. During this time, the gunite shell should be watered two to three times a day to prevent cracks and ensure a strong, durable finish.
Step 6: Tile and Coping
Once the gunite has cured, it’s time to add the tile and coping.
Materials: Common materials for tile and coping include natural stone, ceramic, and concrete. Choose materials that complement your pool’s design and your home’s aesthetic.
Installation: The tile is installed along the waterline, while coping is placed around the pool’s edge. Proper installation ensures a seamless look and prevents water from seeping behind the tiles.
Step 7: Decking and Landscaping
Decking and landscaping enhance the pool area and provide functional space for relaxation and entertainment.
Options: Popular decking materials include concrete, pavers, and natural stone. Each material offers a unique look and feel, so choose one that fits your style and budget.
Installation: Decking should be installed by professionals to ensure a level surface and proper drainage. Landscaping can include plants, lighting, and outdoor furniture to create a welcoming environment.
Aesthetics: The right combination of decking and landscaping can transform your pool area into a stunning outdoor oasis.
Step 8: Finishing Touches
The final step involves plastering the pool, filling it with water, and balancing the chemicals.
Plastering: A smooth plaster layer is applied to the gunite shell to create a watertight surface. This layer can be customized with different colors and finishes to achieve the desired look.
Filling: Once the plaster has set, the pool is filled with water. This is an exciting moment, as it signifies that your pool is almost ready for use.
Chemical Balancing: Before you can start swimming, it’s important to balance the pool’s water chemistry. This involves adding sanitation chemicals like chlorine and adjusting the pH levels to ensure the water is safe and clean.
By following these steps, you can build a beautiful and durable gunite pool that will provide years of enjoyment. Next, we’ll discuss how to maintain your gunite pool to keep it in top condition.
Maintaining Your Gunite Pool
Once your gunite pool is built, maintaining it is crucial for longevity and enjoyment. Here’s how to keep your pool in top shape:
Routine Care
Weekly Tasks:
– Skim the Surface: Remove leaves and debris.
– Brush the Walls: Prevent algae buildup.
– Check the Filter: Clean or replace as needed.
– Vacuum the Pool Floor: Ensure a clean bottom.
Chemical Balancing:
– Test Water Chemistry: Use a test kit to check pH, chlorine, and alkalinity levels.
– Adjust Chemicals: Add chlorine, muriatic acid, or sodium bicarbonate to balance the water. Aim for a neutral pH.
Algae Prevention
Regular Treatment:
– Shock the Pool: Add a high dose of chlorine weekly.
– Algaecide: Use as a preventive measure.
Proper Circulation:
– Run the Pump: Ensure water circulates for at least 8 hours daily.
– Inspect Jets: Make sure they are positioned correctly to promote circulation.
Resurfacing
Over time, your gunite pool may need resurfacing to maintain its appearance and functionality. Here are the steps:
- Drain the Pool: Remove all water.
- Clean the Surface: Use a sandblaster or chemical treatments.
- Fill Cracks: Use underwater pool patching for small cracks. For larger cracks, consult a professional.
- Prime the Surface: Apply a specific primer epoxy.
- Finish with Topcoat: Apply three to four coats of epoxy, sanding between each layer.
- Refill the Pool: Wait 5-7 days before refilling.

By keeping up with routine care, algae prevention, and resurfacing when necessary, your gunite pool will remain a beautiful and functional part of your home for years to come. Next, we’ll address some frequently asked questions about gunite pools.
Frequently Asked Questions about Gunite Pools
What is the difference between gunite and shotcrete?
Gunite and shotcrete are both methods of applying concrete, but they differ in their application process and mixture.
- Gunite is a dry mix. The dry materials are pushed through a hose with compressed air, and water is added at the nozzle just before application. This allows for more flexibility in stopping and starting the application without compromising the integrity of the concrete.
- Shotcrete is a wet mix. The concrete is premixed with water before being sprayed through a hose. This method is quicker but less flexible, as it needs to be applied continuously to avoid cracks.
Both methods result in strong, durable pools, but gunite’s flexibility makes it a preferred choice for custom shapes and intricate designs.
How long does it take for a gunite pool to cure?
Gunite pools require a curing period of approximately 28 days. During this time, the concrete fully bonds and reaches its maximum strength.
- Initial Cure: The first 7 days are crucial. The surface must be kept moist to prevent premature drying and cracking. This is usually done by spraying the gunite with water several times a day.
- Final Cure: The remaining 21 days allow the concrete to achieve full hardness and durability. During this period, avoid any heavy loads or impacts on the pool structure.
Weather conditions can impact curing times. Cold or wet weather may extend the curing period, while hot, dry conditions may require more frequent wetting to prevent cracking.
What are the long-term maintenance costs for a gunite pool?
Maintaining a gunite pool can be more costly than other types due to its porous nature and the need for regular upkeep. Here are some key points:
- Annual Costs: On average, maintaining a gunite pool costs around $2,700 per year. This includes chemicals, electricity, and routine maintenance.
- Resurfacing: Every 10-15 years, the pool will need resurfacing, which can cost between $4,000 and $10,000 depending on the size and finish.
- Acid Washing: To remove stains and algae, an acid wash every 3-5 years might be necessary, costing around $300 to $500.
- Chemical Balancing: Regularly balancing the water chemistry is essential to prevent damage to the pool surface and plumbing. This involves adding chlorine, pH balancers, and other chemicals.
By understanding these costs and planning for them, you can ensure your gunite pool remains a beautiful and enjoyable feature of your home for many years.
Next, we’ll dive deeper into the conclusion and customer satisfaction aspects of owning a gunite pool.
Conclusion
Building a gunite pool is an investment in your home that offers long-term benefits. At Creative Edge Pools, we pride ourselves on delivering not just high-quality pools but also exceptional customer satisfaction.
Customer Satisfaction
We understand that constructing a pool is a significant project. That’s why we keep you involved every step of the way. From the initial design to the final touches, our team ensures you are well-informed and comfortable with every decision. Our customers often rave about their experiences, praising our transparency and commitment to quality.
“The team at Creative Edge Pools made the entire process seamless. We always knew what to expect and felt like our needs were prioritized,” says one satisfied homeowner.
Creative Edge Pools
With over a hundred years of combined experience, our family-owned business knows what it takes to build a pool that stands the test of time. We handle everything from excavation to finishing touches, ensuring that each aspect meets our high standards. Our expertise allows us to complete projects efficiently without sacrificing quality.
For more information on how we can help you build your dream gunite pool, visit our Gunite Pools service page.
Lasting Value
A well-constructed gunite pool offers lasting value to your property. Not only does it enhance the aesthetic appeal of your home, but it also provides a space for relaxation and entertainment. With proper maintenance, a gunite pool can last for decades, making it a wise investment for any homeowner.
By choosing Creative Edge Pools, you’re not just getting a pool; you’re getting a partner dedicated to bringing your backyard vision to life. Whether it’s through our meticulous construction process or our ongoing support, we aim to provide a pool that you and your family will enjoy for years to come.
Ready to transform your backyard into a paradise? Contact us today to get started on your gunite pool journey.
This concludes our guide on constructing a gunite pool. We hope this information helps you understand the essential steps and considerations involved in building your dream pool. For more details and personalized consultation, don’t hesitate to reach out to us.